Transforming a plain tank into a cinematic, living scene starts with your foundation. The right choice of stones sets the mood, creates depth, and guides the eye before any plants fill in.
Buce Plant selects aquarium-safe, hand-picked stones for texture, shape, and natural charm. Choices like Seiryu, Dragon Stone, Elephant Skin, and Lava Rock offer a wide variety for every budget and vision.
Think of the hardscape as the first visual decision in aquascaping. A smart layout makes fish and shrimp feel at home and gives the planted scene long-term stability and scale.
This buyer’s guide focuses on freshwater, planted setups in the United States. You’ll learn how to pick stones by texture, shape, color, and safety, and which options suit styles like Iwagumi, mountain scenes, or riverbeds.
Key Takeaways
- Aquarium Hardscape Rocks.
- First impression matters: the foundation shapes the entire look.
- Choose stones for texture and stability to support long-lasting layouts.
- Popular options (Seiryu, Dragon, Elephant Skin, Lava) fit many budgets.
- Focus on safety and water chemistry for freshwater planted tanks.
- Good design guides the eye, creates depth, and makes livestock feel natural.
Why Rocks Are the Foundation of a Breathtaking Aquascape
Before plants mature, the scene must already read as natural and intentional. The right mix of stones, driftwood, and substrate gives your layout its bones: height, negative space, and a clear focal flow.
Thoughtful placement builds depth. Slopes, staggered stones, and shadow lines create foreground-to-background transitions that guide the eye. This makes an aquascape feel like a slice of real landscape—mountains, riverbanks, or canyon walls—right away.
- Structure and stability: lay substrate first, then set rock and wood so pieces anchor into the slope.
- Function: stonework shapes water flow, creates shelters, and provides attachment points for epiphytes.
- Storytelling: a clear main mass with supporting pieces reads as a believable scene over time.
Following this sequence matters. It prevents crushing delicate plants and ensures secure, long-lasting layouts. A strong foundation makes both low-tech and high-tech planted aquarium builds look intentional as plants grow and the composition evolves.
Aquarium Hardscape Rocks Buying Guide: What to Look For Before You Buy

Begin by inspecting texture up close; tiny ridges and pits create realism under light.
Shopping checklist: Evaluate surface detail first. Micro-contrast—ridges, veins, and pits—reads as natural under LED or daylight. Look into holes and crevices; Dragon Stone’s erosion-made cavities are perfect for moss and small epiphytes.
Choose a clear dominant silhouette for your focal area and supporting pieces that echo that shape. Flatter contact faces and interlocking edges give stable stacks. Avoid overly round pieces that may roll and need extra bracing.
Match color tones to your substrate and plant palette. Cool grays feel alpine, warm browns feel earthy, and darker tones boost leaf color. Remember: Seiryu can raise KH/GH because of carbonate content, while Manten-style stones are inert and safer for planted tanks.
“Think in sets, not singles — buy a family of pieces that share texture and scale.”
Wash and brush every piece to clear dust from holes and crevices before installation. For curated, aquarium-safe selections that save time and risk, consider sources that vet their stock and label chemistry clearly. For extra guidance, see this shopping reference.
Popular Aquascaping Rock Types and the Looks They Create

Different stone types translate immediately into visual themes: alpine peaks, canyon walls, or mossy ruins.
Seiryu stone
Craggy, vein-lined mountain aesthetic. Seiryu stone gives an Iwagumi or ridge build that reads as rugged peaks. Darker Seiryu variations add deep gray-blue tones and white veins for a moody, high-contrast look under LEDs.
Dragon stone (Ohko)
Warm, earthy tones and scale-like texture. Dragon stone is inert, so it’s safe for planted layouts and offers holes for moss and epiphytes. Use clusters to create natural nooks and layered detail.
Lava rock
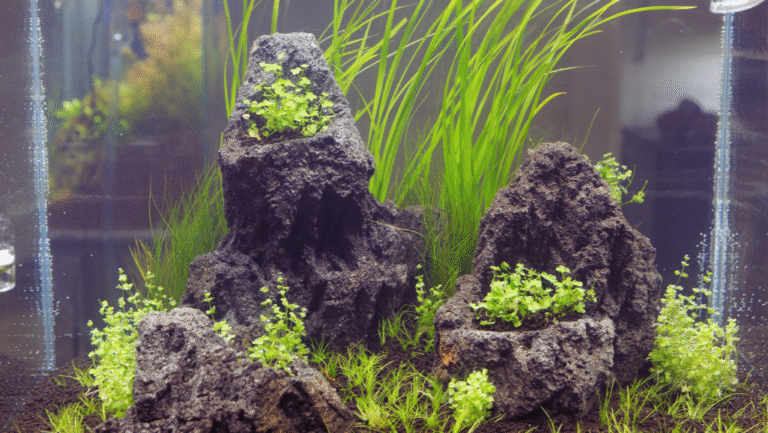
Porous, ancient texture with high utility. Lava rock anchors plants easily and provides extra surface area for beneficial bacteria. Its rugged surface ages a scene and supports biological filtration.
Pagoda & canyon-style stones
Layered, striated cliff walls. These pieces stack into terraces and vertical faces that mimic canyon scenes. They add strong linear direction and dramatic perspective when arranged in tiers.
Elephant Skin & dolomite-style
Weathered, dramatic texture. These stones offer bold surface detail that reads primal and raw. Note: some dolomite types can raise water hardness, so plan livestock accordingly.
Flat stones
Paths, caves, and stable bases. Flat stones create clean trails, cave entrances, and steady support under driftwood. Use them to define foreground paths or stable terraces.
- Pro tip: buy multiple pieces from the same stone type to keep consistent grain, surface character, and color across your aquascape.
Water Chemistry and Livestock Compatibility

What looks good can also change your water—pick pieces with both aesthetics and chemistry in mind.
Why chemistry belongs in a buyer’s guide: the wrong stone can nudge aquarium water chemistry over time and harm plants or livestock. Test after installation so changes don’t sneak up on you.
Which stones raise water hardness and why it matters
Carbonate-rich stones, like seiryu stone and many dolomite-style types, release carbonates that increase KH and GH. That shift affects species choice and planted aquarium stability.
Practical seiryu stone management playbook
Expect most carbonate release in the first 1–2 weeks. Do larger, more frequent water changes then. If you need soft water targets, mix in RO or demineralized water to control aquarium water hardness.
Inert options for steady parameters
Dragon stone and Manten-style stones are largely inert. They let CO₂, fertilizer, and lighting dictate plant success without altering GH or KH.
Texture, edges, and livestock compatibility
Smooth, rounded pieces suit delicate-finned fish and shrimp-friendly setups. Sharp faces can tear fins or stress shrimp, so balance dramatic shapes with safe hiding spots.
- Pair your stone choice with the stocking plan: soft-water nano fish or shrimp need inert or treated materials.
- “Inert” doesn’t mean boring—use it to control the look while you dial water targets.
- Monitor KH/GH over the first few weeks of time to confirm stability.
Choosing Rocks for Your Aquascaping Style and Layout

Let the intended scene — mountain, path, or minimalist field — guide each stone choice. Start by sketching your tank footprint and marking focal points. That plan saves time and prevents buying mismatched pieces.
Iwagumi layouts
Pick a strong main stone as the visual anchor. Then select supporting stones that share grain, texture direction, and color tones.
Buy multiple pieces of the same type so the composition reads calm and cohesive over time.
Mountain range layouts
Use angular, bold stones like Seiryu or Manten-style to build rugged structure and drama.
Place smaller pieces toward the back to push perspective and leave intentional negative space for depth.
Riverbed and path layouts
Choose rounded stones and flat stone slabs to form flow lines, trails, and gentle transitions.
Smaller mid-to-detail pieces make a believable riverbed and protect delicate fish by softening sharp edges.
- Practical tip: estimate quantities by sketching and measuring focal stone sizes before ordering.
- Maintenance: stable layouts resist shifting during cleaning and keep plant beds defined.
Pairing Rock With Wood, Plants, and Glue for a Mature Look
Pairing branchy wood with stone transforms a static pile into a lived-in landscape full of movement. This combination adds contrast, scale, and a natural flow that makes the scene read as aged and calm.
Spider wood and branchy pieces for flow
Spider wood (Redmoor) brings thin, branching limbs that lead the eye through the aquascape. Use a few branchy pieces to break up heavy masses and suggest roots or fallen limbs.
Planning around tannins
Some wood will release tannins that tint water and may lower pH. Pre-soak for 1–2 weeks with water changes to reduce this effect.
Run activated carbon for clearer water if you prefer no coloration.
Best plant matches & attachment methods
Mosses, Anubias, and Java fern attach to surfaces and age stone and wood gracefully. Rough texture hides tiny glue dots and helps rhizomes grab hold.
- Use small dots of aquarium-safe glue to fix rhizomes or moss.
- Biodegradable thread works well until roots secure the plant.
- Test-fit pieces dry, lock the composition, then attach plants to reinforce the story.
“Aim for a composition-first build: lock sightlines, then add plants to finish the scene.”
Getting the Right Size, Pieces, and Quantity for Your Tank

Scale makes or breaks a layout: one oversized stone will dominate a small tank while tiny pieces vanish in a large display.
Measure inside the tank first. Note visible height, foreground swimming space, and filter placement before buying.
Scale and mini tanks
In nano and pico tanks, boutique-style small stones and detail pieces add depth without crowding. Choose a single hero piece that fits the visual weight, then add smaller supports.
Mixing sizes for realism
Use boulders as anchors, medium stones for transitions, and tiny pieces for texture and natural clutter. Flat stones work well to stabilize driftwood bases and define paths.
Quantity, stability, and depth
- Buy enough pieces to interlock and support slopes rather than balancing on few contact points.
- Partially bury bases and slope substrate up toward the back to build depth.
- Leave planting lanes and root zones so plants can thrive and delicate stems remain protected.
“A measured purchase saves time and prevents costly re-buys when scale is off.”
Cleaning, Preparing, and Installing Aquarium Stones Safely
A calm, careful prep routine makes the installation feel like craft, not chaos. Take time to clean each piece and plan placement before lifting a single weight into the tank. This protects livestock and preserves your aquascape vision.
Washing and brushing: rinse stones with clean tap water and use a stiff brush to flush dust from holes, cracks, and crevices. Repeat until rinse water runs clear. No soaps or chemicals. They can leave residues that harm plants and fish.
Stability and tank-bottom protection
Test contact points outside the glass. Lean pieces into one another, partially bury bases in substrate, and avoid single-point loads.
Gently place heavy pieces, distribute weight, and use flat support stones to protect the tank bottom from pressure.
Timing your build
Follow the order: substrate, then stone and wood, then plants, then slow filling. Fill against a plate or bag to avoid collapsing slopes.
“Step back for a final visual check: confirm your focal point, negative space, and that foundation stones look naturally embedded.”
- Rinse, brush, place, stabilize, then plant and fill.
- Final adjustments now save effort later.
- For more on materials and layout, see elements of aquascaping.
Conclusion
, A well-chosen stone family turns a blank tank into a story you can watch grow.
Use the decision framework: pick a stone type that matches your target look, confirm chemistry fits your planted aquarium, then buy a mix of sizes for realism.
Focus on the big three—texture, stability, and color harmony—so your investment lifts the whole display. Also make water chemistry and livestock safety part of the plan; stable parameters and secure hiding spots help plants and animals thrive.
Sketch a layout, choose a consistent family of pieces, and commit to enough material to build depth. With variety available in the U.S., you can create craggy mountains, warm canyon walls, or smooth riverbeds that get better with time. Ready to start creating your perfect planted aquarium?
FAQ
What role do stones play in creating depth and realism in a planted tank?
Stones form the visual backbone of any planted display. Their texture, color, and placement create perspective, focal points, and negative space that guide the eye. Use layered pieces and varied sizes to mimic natural landscapes and build believable depth.
When should I add stone and wood during the build sequence?
Place substrate first, then arrange stone and wood to lock the layout in place before planting. This lets you sculpt slopes and create stable anchor points for roots and epiphytes without disturbing plants later.
How do I choose stone by texture and surface detail?
Look for varied surfaces—rough faces, striations, and tiny crevices add realism and planting sites. Smooth slabs work for paths and caves; craggy pieces create mountain-like vistas. Mix textures to avoid a flat, artificial look.
What shapes and edges are best for stacking and stability?
Favor stones with flat contact points or natural ledges for safe stacking. Angular pieces with interlocking edges create sturdy builds; rounded stones suit riverbed or path layouts. Always test-fit and support heavy elements from below.
How do color tones affect plants and overall composition?
Warm, earthy tones highlight green foliage and soft sand, while cooler grays and blues emphasize contrast and a more rugged mood. Combine complementary tones to enhance plant colors and create mood without overpowering livestock.
Are crevices and holes useful for planting?
Yes. Crevices and shallow pockets are perfect for mosses, Anubias, and small epiphytes. They provide stable attachment points and microhabitats, increasing visual complexity and hiding spots for shrimp and small fish.
Which stone materials affect water chemistry and how do I manage them?
Some carbonate-rich stones raise GH and KH over time. Regular water testing helps you spot changes. If you need stable soft water, choose inert options that don’t release minerals. Water changes and reverse osmosis mixes can counteract mineral release.
Is Seiryu stone safe for planted setups and fish?
Seiryu stone is prized for dramatic texture but can raise carbonate levels. It works well if you monitor GH/KH and adjust water changes or use softened water. For delicate species, consider alternative inert stones.
How does Dragon stone compare for planted tanks?
Dragon stone (Ohko) offers warm tones and a scale-like texture that attaches plants easily. It’s generally inert and supports stable chemistry, making it a popular choice when you want earthy color without altering water hardness.
What are the benefits of porous lava rock?
Porous lava provides high surface area for beneficial bacteria and holds moisture around roots. It’s lightweight, easy to hide, and excellent for shrimp and biological filtration, though its look suits more rugged aquascapes.
How do I select stones for specific styles like Iwagumi or riverbed layouts?
For Iwagumi, pick a dominant main stone and harmonize with smaller supporting stones that echo shape and texture. For riverbeds, choose rounded, flat pieces to form gentle paths. Scale, balance, and repetition are key to each style.
What wood pairs well with stone to achieve a natural flow?
Branchy pieces, such as spider wood, create contrast and mimic tree roots when combined with stone. Plan attachment points where wood tucks against stone to form cohesive scenes and avoid obvious gaps.
How do I deal with tannins released by some wood types?
Tannins tint water amber but are harmless. Pre-soaking or boiling wood reduces release. Activated carbon in filters and regular water changes clear discoloration faster while retaining the natural look if desired.
Which plants attach best to stone surfaces?
Mosses, Anubias, Bucephalandra, and small ferns excel on stone faces and in crevices. Use aquarium-safe glue or cotton/thread to secure them until roots take hold, then remove any temporary ties.
Is aquarium-safe glue necessary for attaching plants to stone?
Yes. Use cyanoacrylate gel marked safe for aquatic life or plant-safe epoxy to attach rhizomatous plants and moss. These adhesives cure quickly and keep attachments secure during planting and water changes.
How many pieces and what sizes should I buy for a given tank?
Scale matters. Use one dominant feature stone, several mid-size companions, and many small detail pieces to simulate natural erosion. For nano tanks, favor smaller, flatter stones; for larger tanks, include boulders and terraces.
How do I prepare new stone before placing it in the tank?
Rinse thoroughly and scrub to remove dust and loose particles from holes and crevices. For mineral-rich stones, a vinegar soak can reveal carbonate content; rinse well afterward. Never use soaps or detergents.
What stability tips prevent collapses and protect the glass bottom?
Build on a firm substrate layer and use slate or acrylic bases under heavy pieces to spread weight. Interlock stones and avoid tall, narrow stacks. Test stability by applying gentle pressure before filling with water.
When is the best time to plant after installing stone?
Plant immediately after final positioning and before filling, when possible. Attach epiphytes and mosses while components are dry for easier handling, then slowly add water to avoid dislodging placements.