Start with a clear vision for a lush, healthy aquascape and learn a calm, step-by-step routine that helps new greenery settle fast.
Most nursery specimens arrive in plastic pots with rock wool that must be removed before you set them in the tank. Rhizome types like Anubias and Java fern attach to wood or rock and do not need substrate.
Rooted rosettes and runners should sit with their crowns just above the sand or substrate surface. Stem varieties do best as individual stems placed 2–3 inches deep, not left in tight bunches.
Expect a short transition: many specimens are grown emersed and will shed older leaves before new submerged growth appears. With proper anchoring, spacing, and the right mix of root and water-column nutrition, your scape will reward patience.
Key Takeaways
- Planting Potted Aquarium Plants.
- Remove nursery rock wool and gently unpot each specimen before placement.
- Attach rhizomes to hardscape; set rosettes and runners with crowns above substrate.
- Plant stems individually and consider a brief floating period for root development.
- Expect initial leaf melt from emersed-grown specimens; new submerged leaves follow.
- Use root tabs or water-column dosing as appropriate and anchor delicate pieces to prevent drifting.
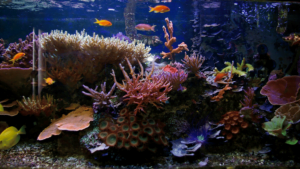
Why plant live greens now: the present-day case for a lush, healthy aquarium
Live foliage works quietly: it absorbs excess nutrients, lowers nitrate load, and returns oxygen to the water so fish breathe easier and displays stay clear.
Beyond chemistry, greens provide real shelter and encourage natural behaviors. Hiding spots and foraging areas reduce stress and aggression, while dense moss gives fry safe cover that boosts survival.
- Stability now: living elements take up nitrogenous waste and steady water parameters.
- Visual and routine benefits: daily care becomes a mindful habit that speeds healthy growth.
- Styling options: sand zones with planted islands frame open swims and highlight wood and stone.
- Choose your kind: low-tech species suit busy owners, while faster growers reward higher-energy setups.
If you want plant density quickly, start with runners and stems that spread, then add signature specimens for depth. Plan using diverse layers—top, mid, and bottom—so every inch of the tank feels intentional and resilient. Click expand your ideas one step at a time and embrace simple routines; your scape will repay you with steady, inspiring growth.
Essential tools and materials to start with confidence
Use a small, focused kit so each step feels intentional. Stock long tweezers to insert roots deeply and evenly. Keep spring scissors nearby to trim long or damaged roots before you set each piece in the substrate.
Choose your base thoughtfully. Sand gives a clean, natural look and open swim areas. Aqua soil supplies nutrients for demanding species and carpets, but it can cloud if mixed with sand. For hybrid layouts, separate sand and soil with clear hardscape lines to keep the bed tidy.
Handy items that save time
- Long tweezers, spring scissors, and a small tray to sort portions from pots and plastic containers.
- Super glue gel and sewing thread to attach rhizome types to wood or rock; dry contact points with cotton before gluing.
- Plant weights for day-one anchoring; remove once roots take hold.
- Spare containers for rinsing and staging so work flows smoothly and the tank stays clean.
Match each kind of specimen to the right substrate and tool. When you do, the process will click into place—simple, fast, and satisfying. For setup ideas, planted tank setup.
Unpotting done right: removing plastic pots, rock wool, and fertilizer beads
Start slow and deliberate. Removing the outer pot and rock wool the right way protects delicate crowns and speeds early recovery.
Hold the plastic pot firmly and squeeze to slide out the root mass and rock wool. Support the base so stems do not bend or stretch while you work.
Split the wool like a soft bun and lift from the center to free the roots. Tease strands away with fingers, tweezers, or a fork until the bulk of the wool comes off.
- Remove fertilizer beads. Seek and pick out any small yellow beads so they won’t dissolve and spike nutrients in the water.
- Rinse roots in clean water to wash away fine wool dust and keep the root system moist while you stage portions.
- Trim only a little from overgrown or tangled roots to encourage fresh branching without weakening the plant.
For plants small enough to fragment, separate gentle portions you can handle; avoid shredding into tiny bits that float or are hard to anchor. If you plan to set into sand or another substrate immediately, stage portions by size so your rhythm stays smooth and the final scape looks intentional. Click expand your technique and the process will feel fast and confident.
Quarantine and dips to keep pests and algae out of your tank
Before a new green arrives in your display, give it a quiet quarantine so you can spot snails, algae, and shipping damage early.
Set up a simple holding station — a tub or spare tanks — and keep fresh water and gentle flow. Remove any lead weights and cotton from bunches first, then rinse portions to dislodge grit and beads.
- Observe for a few days: check daily for pests, brown slimy algae, or leaf decay and trim any rot promptly.
- Bleach dips work: use a mild, measured solution only when needed; neutralize and rinse thoroughly so no residue ever reaches your display.
- Tissue culture advantage: sterile cups from a pet store often arrive free of snails and nuisance algae, saving time and treatments.
- Lighting and flow: keep illumination low and water movement gentle — new arrivals do not need much light while they recover.
Record how each specimen reacts in quarantine to help choose its final spot. When you protect the main aquarium this way, your hardscape and livestock stay healthier. Click expand your routine and those small checks will repay you with steady, clean growth.
Choosing the best substrate for growth: sand, aqua soil, and root tabs
Choosing the right bed beneath your green layout sets the stage for long-term health and visual balance.
Sand gives a clean, bright look and is easy to keep tidy in open compositions. It contains little nutrition, so use root tabs under heavy root feeders and consolidate planted zones with clear hardscape lines to avoid drifting granules in tanks.
Aqua soil feeds demanding species and carpet growth quickly. Handle it carefully where it meets sand so the two beds do not mix. Expect a brief nutrient release at the start and manage it with strong filtration and steady water changes.
- Root tabs under rosette feeders like swords and crypts help them grow well from the bottom.
- Rhizome plants sit on the surface or hardscape; never bury the rhizome and let the water column feed them.
- Avoid garden or organic potting mix underwater — it breaks down and clouds the water.
Start with one kind of substrate as your anchor and accent zones thoughtfully. Click expand your plan and the scape will be easier to maintain and support steady growth. Click expand for placement tips that match your tank.
Planting potted aquarium plants: a step-by-step beginner workflow

Prepare your layout and sort each pot’s portions so the session feels calm and clear. Stage tools, trays, tweezers, and spare pots before you work.
Unpot carefully: squeeze the pot to slide out the root mass and split the rock wool to free the roots. Remove any fertilizer beads and rinse debris so tissues stay moist and healthy.
- Work back to front: pre-shape sand paths and substrate mounds, then plant with long tweezers to avoid disturbing finished areas.
- Set stems individually about 2–3 inches deep; do not leave tight bunches. Use weights when stems float and remove them once roots grab hold.
- Keep rhizomes above the substrate and tie or glue them to wood or stone where flow and dappled light help new leaves harden.
After placement, fan the water gently to release trapped air and settle particles. Finish with a partial water change and a measured nutrient dose, then take a quick photo so you can track how your design begins to grow. Click expand this way to help your new greenery settle, and click expand to document how plants move in the first week.
Rhizome plants (Anubias, Java fern, Bolbitis): attach, don’t bury
Rhizome varieties anchor themselves sideways. Spot the thick horizontal core where leaves emerge. Keep that band free above the substrate so the crown breathes and new roots grow down into textures.
Mounting is simple and permanent. Place the rhizome on a dry contact point of wood or rock and secure it with a short length of thread or a tiny dot of super glue gel. Hold briefly until set; new roots will soon grip the surface.
- Identify the rhizome: a firm horizontal stem—do not bury it under sand or gravel.
- Use gentle tension: wrap thread loosely so the piece can settle and roots can explore crevices in the rocks.
- Feed from the water: these species prefer liquid dosing; try an all-in-one fertilizer for steady color.
- Shield the base: nest a pot in a decorative planter if boisterous fish uproot your work.
Place in moderate flow and dappled light so leaves open without algae stress. For layout ideas, click expand and try bridging branch tips or tucking a small rhizome behind stones for layered depth.
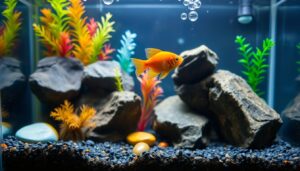
Sword plants: heavy root feeders that love the tank bottom

Sword varieties form a bold rosette at the tank floor and demand a generous, stable root zone to thrive. Give them room and treat the crown with care so growth starts fast and steady.
Dig a wide hole, spread the roots outward, and backfill so the crown sits just above the surface. These rosette types are heavy root feeders; they need space at the bottom and freedom for roots to expand.
- In sand or other inert beds, press root tabs beneath the root zone and refresh regularly to keep lush, continuous growth.
- Expect older emersed leaves to melt; trim faded tissue and focus on the longer, narrower submerged leaves that follow.
- Seat large varieties in the midground or background so broad foliage doesn’t block light to slower neighbors; if a base wobbles, remove extra sand and set the roots deeper.
Don’t bury the crown or leave a nursery pot constricting the roots. Keep flow gentle while new growth hardens. For a confident, elegant result, click expand this way and let these steady growers anchor your layout.
Cryptocoryne (“crypts”): patient planting for plants that melt
Crypts need a calm, rooted start and reward patience with steady, low-key beauty.
Seat each crypt with roots buried and the crown just above the substrate so the collar breathes. Tuck a root tabs beneath clumps in inert beds to give slow feeders a quiet food source.
Expect a melt phase as emersed foliage gives way to new submerged leaves. Resist uprooting; many varieties lose old tissue before glossy, compact leaves return. C. parva is the notable exception—its foliage often stays intact.
- Keep spacing modest and angle each clump so mature leaves fan naturally.
- Use a slightly deeper substrate where roots can spread without disturbing neighbors.
- If you prefer a neater start, trim emersed growth at placement—skip that step for C. parva.
A simple, steady routine is the best way to let crypts show their many colors and textures. In short, set them right, give time, and your tanks will display dependable movement and form. Click expand and enjoy the slow reveal.
Grass-like and runner species: spacing, encouraging runners, and sharing starters

Fine, grasslike species form flowing carpets when given room to send runners and settle. Separate the clump into single crowns and work with small gaps so each shoot can spread naturally.
Set crowns into sand with about a thumb’s width between them. That airy spacing lets light reach the base and helps daughter plants appear fast.
- Gently tease apart clumps into individual plantlets and press each base into sand so roots can touch the bottom without burying the leaf collars.
- When runners create rooted daughter plants with a few sturdy leaves, snip the stolon and replant the new crown to expand a meadow or share with other tanks.
- Place taller Vallisneria behind low foreground plants so leaves arch over paths and soften hard edges without blocking sightlines.
- If plants small drift, cradle a pinch of sand or tuck a tiny rock beside the base until roots hold.
Keep trims regular so grassy lanes look intentional and fish enjoy clear swim routes. For a simple, repeatable way to grow a lush mat, click expand.
Mosses made easy: thread, glue, and removable rock or mesh pads
Moss offers one of the easiest ways to add age and texture to hardscape without heavy maintenance. It attaches quickly and gives a lived-in look that feels calm and natural.
Use simple methods to secure moss where you want it. Tie small stitches of thread around clumps to hold them to rocks or branches while roots establish.
Alternatively, dot a dry contact point with super glue gel, press the moss for a few seconds, and mist so fronds do not dry. For flexible care, spread a thin layer on mesh or lava and secure with thread so the mat grows evenly and can be lifted whole.
- Spread a thin layer on mesh or lava and secure with thread for easy lifting and sink-side trimming.
- Dot super glue gel on dry contact points, press gently, and mist so new fronds stay moist during placement.
- Moss is priceless for breeding since dense fronds hide fry from adults and create a living nursery in gentle water.
- Float a spare clump near the surface to cast shade and offer shy fish a resting spot; harvest later to seed new pads.
- Rinse removable pads under tap water during maintenance to keep debris low and the scape fresh and inviting.
Mix textures—feathered, tight, and cascading—to dress rock and branch surfaces. This makes the whole layout feel older and more peaceful.
Click expand to try a small moss pad first; marimo sit on the surface or attach but never bury their base. With a couple of simple tools you can build soft cover that supports fish, fry, and a sense of calm.
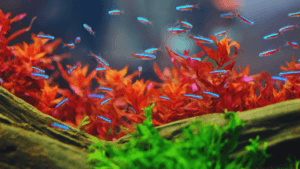
Stem plants and lead bunches: separate, space, and anchor

Stem bunches arrive tight; open each cluster gently so you can sort stems by height and vigor. Remove lead rings, cotton, and any weights before you work. This helps you map terraces and smooth gradients from front to back.
Work one stem at a time. Use long tweezers to seat each stem 2–3 inches deep so lower nodes stay buried and new roots form in substrate or richer soil bands. Space stems in a loose grid rather than tight clumps to ease flow and light.
Deep placement and avoiding tight clusters
Plant individual stems deeply and sort by height when you set them. Add a tiny weight at the base only if stems float. Remove weights once roots take hold so lines stay clean and upright.
Floating stems to root before final setting
If a portion lacks roots, float it at the surface until tiny rootlets appear. Once rooted, transplant to substrate or soil and rely on water-column dosing for steady nutrition. Combine needle, oval, and ferny leaf shapes to craft texture that helps the group grow well.
- Open lead bunches, discard weights and cotton, and sort by height.
- Plant stems 2–3 inches deep with space between each.
- Float unrooted stems until rootlets show, then plant.
Click expand to try a small test bed first. Click expand for layout tips that help stems establish quickly in your tank.
Bulb and tuber species (banana plant, lily, lotus, aponogeton)
Bulbs and tubers do best when given a gentle, visible start on the bottom of the tank. Rinse each bulb to remove loose media, then rest it on the sand or substrate rather than burying the crown. This reduces rot and gives new shoots a clear way up.
If a bulb floats, don’t panic. Tuck it under a small stone or wedge it under hardscape for a week so it hydrates and sinks. Once it settles, reposition where emerging leaves can frame the scape without shading key features in other tanks.
- Watch the crown: new leaves usually appear from the top. If nothing shows in one to three weeks, flip the bulb—it may be upside down.
- Feed smart: start with light water-column fertilizer and later add a root tab nearby for steady nutrition as roots dig in.
- Placement tips: set tall lilies and aponogeton where pads won’t smother flow or drop shade on foreground areas.
- Shop notes: aponogeton often appears as “betta bulbs” at big-box pet store chains—choose firm, heavy pieces.
- Share the bounty: save and split daughter plants as clumps mature to spread these statement makers to friends or other tanks.
Click expand for layout ideas that let bulbs add drama without risk.
Carpeting plants that stay put: anchoring weak roots and boosting growth

A dense foreground mat needs gentle handling to keep fragile roots from tearing as it establishes.
Keep delicate carpets in their rock wool core when possible. Push the whole plug into soft soil so tiny roots stay protected and branch without shock. Add a single root tab into the center of the wool to feed from below while the mat spreads.
Using rock wool plugs and small soil boosts
Divide the nursery block into five or six larger piece-sized chunks rather than many micro fragments. Larger sections anchor easier and avoid floating troubles.
If little plantlets do float, sprinkle a pinch of aqua soil over the crown to weigh them until the root net forms. Avoid garden potting mix or organic potting in the display—these will foul the water.
Light, CO2, and combined dosing for steady growth
Carpets love bright, even light and pressurized CO2 for compact color and runner pace. Use a measured water-column fertilizer plus targeted root tabs near the mat for balanced nutrition.
- Leave the rock wool core intact for delicate starts.
- Split into a few larger pieces for faster coverage.
- Use aqua soil sparingly to hold stray crowns in sand or mixed beds.
- Trim lightly and often to promote dense runners and short leaves.
Smart maintenance: trimming, moving plants, and pot strategies for easy rescapes
A simple modular approach makes trims and moves fast and clean. Plan for change when you set a layout and you’ll save days of work later.
Hidden pots under the sand are ideal for large crypts and sword plants. Slip a roomy pot just below the surface so you can lift a mature rosette without tearing roots or collapsing the bed.
- Protect sand lines: keep enrichment inside removable pots to preserve open sand and tidy rocks.
- Moss islands: mount moss on lava rock or bent mesh pads so you can remove, trim, and rinse at the sink without clouding the tank.
- Use spare containers so plants move smoothly between tanks or to a new tank during rescapes—this preserves mature root systems and saves weeks of regrowth.
Tuck a small anubias on a pad edge so an accent travels with the pad. Avoid burying random potting mix under sand; contained nutrition keeps the bottom clean and maintenance light. Many hobbyists like idea-wise flexibility—modular setups let your layout evolve with minimal stress for livestock and the scape.
Conclusion
Wrap up with simple, steady steps and you will see steady growth without fuss. Sort, set, and observe—let rhizomes stay above the bed, rosettes keep crowns clear, stems sit spaced, bulbs rest on the surface, and moss live on removable pads.
Start small, refine in stages, and remember many plants don’t need much to thrive. Feed where roots ask for tabs and dose the water column when foliage needs a boost.
If you want plant coverage fast, favor adaptable stem plants and runners first, then add signature pieces as the layout settles. Click expand your routine, choose the way that fits your rhythm, and enjoy how tanks reward steady care with color, clarity, and calm daily joy.
FAQ
How do I unpot store-bought plants without damaging roots?
What substrate should I choose for healthy root growth?
When should I use root tabs versus liquid fertilizer?
How do I attach rhizome species to wood or rock?
What’s the best way to plant carpeting species like Monte Carlo?
How do I prevent crypts from melting after planting?
Should I quarantine new arrivals and use dips?
How deep should I plant sword species and care for their crowns?
What tools make seeding and maintenance easier?
How do I anchor moss without creating a permanent mess?
Can stem cuttings be floated before planting?
How do I handle bulbs and tubers like banana plants or aponogeton?
What’s the safest way to move or trim large root feeders?
How do I encourage runners and spreading in grass-like species?