Turn a glass tank into living art. An Aquascape Aquarium Kit makes it easier to transform glass, plants, rocks, driftwood, and substrate into a calm, natural scene you can enjoy every day—whether you’re setting up a small cube on a desk or a dramatic rimless showpiece in the living room.
This buyer’s guide walks beginners and experienced hobbyists through the essentials — from compact 7.13 gallon cube sets like Mr Aqua Pure to larger rimless displays such as Miotke’s 71‑gallon options. Learn what typically arrives in a kit, what extras to add for thriving plants and fish, and how design choices affect both the tank’s view and ongoing maintenance.
We’ll cover style directions (Dutch, Jungle, Iwagumi, and Nature Aquarium), core gear choices, and practical tips for timing purchases from U.S. retailers like Glass Aqua so you can catch restocks and curated products when they appear.
Key Takeaways
- Start with style: pick a nature aquarium look that fits your space and skill level.
- Check kit inclusions vs. extras — substrate, hardscape, and plants often come separately.
- Smaller cubes suit beginners; larger rimless aquariums deliver more cinematic views and design room.
- Watch retailer stock and restocks to grab popular models and accessories.
- Combine creative aquascape design with reliable equipment for a setup that thrives over time.
Scroll to the section that matches your experience—beginner kits, show tanks, or planting and maintenance—to find the right tank for your space and schedule.
Why Choose an Aquascape Aquarium Kit Today
Choosing an Aquascape Aquarium Kit simplifies decisions and helps you create a calming planted display in any room. A curated aquascape tank bundles compatible parts so your idea moves quickly from concept to a living view—less time sourcing gear, more time arranging plants and hardscape.
Transforming your space with living design
Good lighting and dependable filtration amplify plant growth and keep fish healthy, turning the aquarium into a low-stress focal point that softens a busy room.
Starter sets speed the learning curve: many include a matched light and basic filter so you see plant growth sooner and pick up skills like layout, trimming, and routine care without hunting for compatible components. Always check the product page to confirm exact inclusions.
- Benefits: fewer compatibility headaches, faster setup, and matched performance.
- Who it’s for: beginners who want a turn-key project and intermediate hobbyists who value matched gear.
- Quick checklist: confirm whether the kit includes a light, filter, hood, and any substrate before you buy.
Understanding the aquascape aquarium kit
Start by knowing what arrives in the box and what you’ll need to add later to complete a planted display.
What’s included vs. what you add: Many entry-level aquarium kit packages include the glass tank, a matched LED light, and a basic filter—examples like the Mr Aqua Pure 7.13 Gallon illustrate the compact, all‑in‑one approach. Premium aquascape kits or shrimp-focused bundles may add clearer glass, refined finishes, or upgraded hardware; some 10‑gallon scaper bundles also expand included gear. (Check the product page to confirm current listings and pricing.)
What you’ll usually order: substrate, rocks, driftwood, live plants, planting tools, and optional CO2 or fertilizer. These extras shape your layout, running costs, and long-term plant growth.
Kit value compared to piecemeal builds
Curated aquarium kits cut guesswork and compatibility problems: a balanced light-and-filter combo reduces setup time and the risk of returns. For many hobbyists, the convenience outweighs the marginal cost difference compared with sourcing every part separately.
- Verify inclusions: some bundles add a stand, media, or a hood—others are intentionally minimal.
- Plan upgrades: choose common tank dimensions and filter formats so future swaps and add-ons are easy.
- Check support: return policies, part availability, and warranty information matter for maintenance and livestock health.
Before you buy, open the product specifications and confirm exactly which parts are included so your order arrives ready for planting.
Core components: tank, light, filter, and more
The right combination of tank, light, filter, and substrate sets the stage for long-term success. Start by matching a level, load-rated stand to the tank — the two must share weight so seams and glass stay protected. Many rimless displays deliver an ultra clear view and gallery-style lines when paired with a purpose-built stand.
Tank and stand synergy for stability and style
Choose furniture rated for the filled weight of the tank plus hardscape. A sturdy base preserves glass joins and keeps sightlines clean for rimless aquariums. Quick checklist for tanks: glass thickness, drilled holes (if needed), seam quality, and footprint vs. stand rating.
Tip: If a kit omits a stand, confirm your furniture can safely support water, rocks, and driftwood before you fill the tank.
Lighting that drives plant growth and color
Pick a light that balances output (PAR) and spectrum so plants grow evenly and colors pop. WRGB-style fixtures render vivid greens and reds; popular options include slim WRGB LED kits that offer tuning and shading. For most planted layouts, choose lights that let you adjust intensity and spectrum rather than fixed-output units.
Use shades or diffusers to aim illumination where foreground carpets or background stems need it most — this reduces glare for viewers and helps control algae hotspots.
Filtration for crystal-clear, healthy water
Match filter turnover to tank volume and scape density. As a rule of thumb, moderate planted tanks do well with roughly 4–8× volume turnover depending on layout and livestock; higher flow suits open, hardscape-heavy scenes while dense jungles prefer gentler circulation. Combine mechanical, biological, and chemical media to trap debris, nurture beneficial bacteria, and polish water.
Design for serviceability: quick-disconnect hoses, accessible inlets, and reachable media bays cut maintenance time and make routine cleaning less disruptive.
Substrate and hardscape as your design foundation
Place nutrient-rich substrate where root feeders will anchor and reserve inert cap layers for hardscape-forward scapes. Use stones and driftwood to shape sightlines and create depth; test-fit the layout dry and pre-rinse rocks before the final fill to avoid surprises. Popular rock choices (Seiryu, Dragon/Ohko, lava) pair well with nutrient bases when planned intentionally.
Preflight your build: rinse hardscape, test-fit the filter and light, and plan cable paths before adding water so the finished tank stays tidy and functional.
- Keep tools handy: design access for tweezers, scissors, and long-nosed tools to speed trimming and placement.
- Plan media: layer mechanical, biological, and chemical media so water stabilizes quickly for fish and plants.
- Preflight: test-fit components, confirm stand rating, and pre-rinse hardscape to start with an ultra clean tank.
Right size, right impact: gallons, dimensions, and placement

Picking the right tank size shapes both the visual impact and daily routine of your living display. Think about where the aquarium will sit, how much time you can commit to maintenance, and what kind of view you want from your main seating areas.
From compact cubes to rimless showpieces
7.13 gallon — 11.8 × 11.8 × 11.8 inches — best for: desktops, small nooks, and quick starter projects. The compact cube fits tight spaces and keeps routine care simple.
30 gallon rimless — 35.4 × 11.8 × 17.7 inches — best for: living-room displays that want cinematic depth and longer sightlines for plant layers and fish shoals.
Miotke 71 gal — 35.4 × 23.6 × 19.7 inches — best for: statement aquariums with sweeping hardscape, larger schools, and more complex aquascapes.
Measuring for fit, viewing, and maintenance
Measure inches carefully for stand footprint and wall clearance. Allow swing room for hoses, tools, and easy access to the filter and light so routine maintenance stays comfortable.
Tip: Place tanks away from direct sun and heavy foot traffic to keep conditions steady for plants and fish and to protect the view from glare.
- Match ambition with access: larger aquariums give stability of parameters but need more water changes and time.
- Height matters: an eye-level tank offers an immersive view and reduces neck strain during long sessions.
- Power and layout: confirm outlets are nearby and elevated; tidy cable management improves safety and the overall appearance.
Measure twice before you buy: a well-chosen aquarium size keeps the hobby enjoyable long after setup day.
Aquascaping styles to guide your kit choice
Style choices shape both the look and the work required to keep a planted display healthy and beautiful. Pick a direction early and your gear, plants, and maintenance plan will fall into place.
Dutch: plant-focused abundance
Go Dutch if you love layered rows, color contrasts, and frequent pruning. Best for intermediate hobbyists who enjoy hands-on trimming and color-driven layouts.
This style emphasizes dense groups of stem plants and varied textures, so you’ll want stronger lighting, steady nutrient dosing, and a regular pruning schedule to keep carpets and tall stems balanced.
Jungle: wild, low-maintenance depth
The Jungle look favors large-leafed species, tangles of roots, and forgiving growth — perfect for owners who prefer relaxed upkeep and hiding places for shy fish.
Use broad plants and driftwood to create natural cavities and cover; this approach reduces the need for precise trimming and tolerates a slightly higher bioload as plants fill in.
Iwagumi: rock-led minimalism
Iwagumi centers on hero rocks and open space — ideal for minimalists who want a meditative focal point with tidy planting and crisp sightlines.
This style requires careful rock placement, a clear foreground (usually carpet plants), and disciplined maintenance so the negative space and stone angles remain striking.
Nature Aquarium: a snapshot of the wild
Nature-style scapes mimic hills, riverbanks, or forest scenes using stones, driftwood, and mixed plants. Best for hobbyists who want a believable sense of depth and variation without rigid geometry.
Longer tanks suit sweeping valleys and layered plantings, while cubes highlight vertical wood forms. Collect reference photos and aquascaping ideas ahead of buying plants and hardscape so your plant lists and stone angles support the intended scene.
- Match style to gear: plant-heavy aquascaping needs stronger lights and stable CO2; rock-led layouts benefit from rimless tanks and clear views.
- Gather ideas: bookmark aquascaping ideas and study plant lists, stone angles, and spacing before you commit.
- Plan your role: choose a style that fits the time you want to spend trimming and maintenance — some scapes demand weekly attention, others are more forgiving.
Lighting essentials: LED output, spectrum, and control

Good lighting defines how plants show color and how a tank feels in a room. Choose lights that balance intensity and spectrum so greens stay vibrant, red tones pop, and the overall view is pleasing without harsh glare.
WRGB spectrum for vivid greens and reds
WRGB-calibrated LEDs deliver flexible color tuning that helps highlight plant hues. Fixtures like WRGB slim LED kits let you emphasize reds for stem plants or boost greens for carpets while keeping an adjustable spectrum for balanced growth.
Matching intensity to plant selection
Match output to species: low-light epiphytes (Anubias, Java fern) need moderate illumination; carpeting plants demand higher PAR near the substrate. A practical approach is to start in the low–moderate range and increase intensity as needed for foreground growth.
Tip: Begin with 6–8 hours of light and increase in 15–30 minute steps over several weeks if plants need more energy—monitor growth and algae response closely.
Timers and shades for algae management
Use timers to set a stable photoperiod—start conservative to limit algae while plants establish. Shades and diffusers focus light on the layout, cut spill into the room, and reduce hotspots that encourage algae.
When upgrading light for faster growth, pair it with balanced nutrients and CO2 so plants use available energy rather than algae.
- Quick light guide: low (beginners, epiphytes) — moderate output; medium (mixed plantings) — moderate-high; high (carpets & demanding stems) — high PAR with CO2.
- Monitor plant response for two weeks and tweak intensity incrementally rather than large jumps.
- Keep lenses clean with a microfiber cloth to sustain output and protect your light investment.
Filtration and water treatment for thriving plants and fish
Clean, balanced water is the invisible foundation that lets plants flourish and fish behave naturally. Pairing appropriate flow with solid chemistry gives your display stamina and reduces surprises.
Mechanical, biological, and chemical balance
Effective filtration performs three jobs: capture debris, grow beneficial bacteria, and polish water. Choose media and filter type to match your tank’s size and planted density.
- Mechanical: pads and prefilters trap waste before it clogs media; replace or rinse these frequently.
- Biological: porous media (ceramic rings, bio-balls, sponges) nurture colonies that break down ammonia and nitrite.
- Chemical: resins or activated carbon remove discoloration, odors, or occasional contaminants.
Water conditioners, parameters, and stability
Use a trusted water conditioner at every change to neutralize chlorine and chloramine. Track core parameters—temperature, pH, KH, and GH—and keep conditions steady as plants and livestock establish.
- Filter choice by tank: sponge filters work well for shrimp and nano systems; hang-on-back or canister filters suit most beginner to mid-size planted tanks; larger aquariums often pair best with canisters or external systems for capacity and serviceability.
- Match filter size to bioload: aim for steady, gentle circulation rather than aggressive surge—adjust flow if plants or shrimp prefer calmer water.
- Spare parts checklist: keep extra impellers, O-rings, and a supply of filter media so maintenance is fast and downtime is minimal.
Quick kit add-ons to order: a water test kit, conditioner, spare media, and a basic filter-service toolset—these save time and keep your aquarium stable from day one.
Substrates and gravel: fueling root growth and layout

The base layer you pick determines how plants anchor, access nutrients like iron, and show their best colors.
Choose enriched bases when you plan heavy rooting plants. Nutrient-rich substrate feeds root-feeders and sustains growth over months; examples include planted aquarium soils that supply iron and other micro‑nutrients. For hardscape-led layouts or epiphyte-focused designs, inert sand or gravel keeps chemistry stable and highlights stones or wood.
Nutrient-rich bases versus inert sands
Enriched soils supply long-term nutrients and reduce early dosing—they’re ideal under heavy feeders and tall stems that draw from the substrate.
Inert sands and gravels work well when plants get nutrition from the water column or from root tabs, and when you want a clean, hardscape-forward look.
Grain size, slope, and long-term maintenance
Mix grain sizes for texture and stability: finer grains in the foreground help carpets root, while coarser material toward the back resists compaction and holds structure.
- Sculpt a forward slope to create perceived depth and channel debris to an easy-to-clean area.
- Add root tabs under heavy feeders to extend nutrient life and preserve color between rescapes.
- Rinse inert gravels well to reduce early clouding; avoid over‑rinsing enriched soils so nutrients remain effective.
Plan maintenance with a light gravel vacuum on open areas and minimal disturbance near dense roots—use a small, precise tool to spot-clean and protect growth momentum.
Substrate shopping checklist: pick the base type (enriched vs inert), decide on grain sizes for foreground/mid/back, order root tabs if needed, and include enough depth for carpets and root feeders.
For a deeper dive on substrate options and matching soil types to plant goals, see the linked guide and verify specific product claims for nutrient lifespan and iron content before purchase.
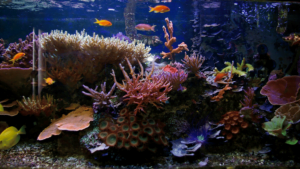
Hardscape choices: rocks, stones, and driftwood
The right stones and driftwood turn glass into a landscape you want to visit every day. Hardscape choices set scale, guide plant placement, and shape fish movement across tanks of any size.
Seiryu, Dragon (Ohko), and lava: color, texture, scale
Seiryu stone offers cool grays and crisp veining for dramatic focal points—use it to create clean lines and contrast with green carpets. Dragon (Ohko) brings warm, weathered texture and natural planting pockets for a lived-in look. Black lava is porous and lightweight, useful for building height without heavy mass; combine it with gravel accents for natural transitions.
Driftwood types and anchoring techniques
Malaysian and spider wood provide sweeping branches and strong silhouettes. Pre‑soak pieces to reduce buoyancy and leach tannins, and consider boiling small pieces to speed the process if time allows.
- Anchor methods: pin driftwood to slate, zip‑tie it to stones, or bury bases in substrate for stability—test each method dry before final placement.
- Visual tips: repeat stone types and angles to create cohesion; apply the rule of thirds for focal placement so compositions feel balanced.
- Safety check: test suspicious rocks with vinegar (no fizz = generally safe) and avoid calcareous stone that can raise pH unless that fits your plan.
Tip: Plan caves and overhangs for shelter but keep swim lanes open so fish move naturally. Dry-test and photograph layouts, then make small micro‑adjustments before the first fill to save hours of rework.
Planting the aquascape: species, stocking, and layout

Layering plants by height and role gives instant depth and purpose to your layout. Plan foreground carpets, midground accents, and tall background stems so the viewer’s eye moves naturally across your hardscape lines.
Foreground carpets, midground accents, background height
Start dense in the front to outcompete algae and establish a stable carpet. Low-tech foreground options: Java moss, Anubias nana petite (as a foreground cluster), or Monte Carlo for moderate light. Midground and epiphytes include Bucephalandra, Cryptocoryne varieties, and small rosette plants. Background stems—Hygrophila, Rotala, or tall Ludwigia—provide height and motion.
Low-tech versus high-tech plant selections
Low-tech setups favor hardy, low-light plants (Anubias, Java fern, mosses) and moderate lighting with less frequent dosing. High-tech builds pair high-output lights, CO2 injection, and faster-dominating carpet species (Hemianthus, glossostigma) for rapid growth and denser scapes—expect more trimming and nutrient management.
“Rinse new plants and inspect for hitchhikers before planting — a tidy start cuts early cleaning.”
Planting workflow (simple step-by-step)
- Dry layout: arrange rocks and wood, photograph variations to choose the best composition.
- Foreground first: plant carpets or low forms to establish the front plane.
- Midground next: place clumps and epiphytes to complement stones/wood.
- Background last: add tall stems and adjust flow so plants sway naturally.
- Tools & trim: use tweezers and scissors for precise placement and routine pruning.
- Feed root feeders with root tabs and dose the water column for stems and fast growers.
- Introduce fish only after plants root and water parameters stabilize—this helps the layout and livestock settle together.
- Monitor growth and prune on a schedule to keep sightlines clear and promote healthy regrowth.
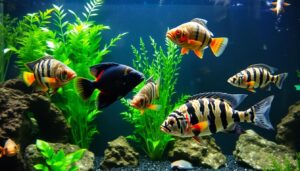
Livestock harmony: shrimp, nano fish, and bioload
Good stocking choices keep your planted aquarium calm, clear, and lively. Match livestock to your filter capacity and planted density to avoid spikes and stress.
Match stock to filter capacity
Build a plan that respects your filter’s flow and biological capacity. A modest bioload keeps water clear and fish behavior natural—estimate impact by species (waste production) rather than raw numbers.
- Stage additions so beneficial bacteria in the filter can cycle up between introductions.
- Keep spare sponges and media on hand and a small quarantine tub ready for new arrivals.
- Sample stocking guide: 7–10 gal — a shrimp colony plus 4–6 small nano fish; 30+ gal — room for larger shoals or mixed communities with hearty filtration.
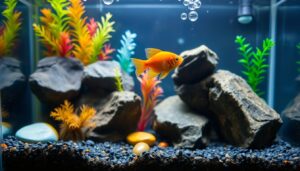
Shrimp and nano fish choices
Shrimp (Amano, Neocaridina) make excellent algae helpers and add delicate motion in plant-rich scapes. Pair shrimp with peaceful nano fish—ember tetras, rasboras, or small rasboras make good companions—avoiding species that hunt juveniles.
Betta compatibility: some bettas will coexist in heavily planted tanks with abundant hiding spots, but many are territorial; research temperament and test cautiously.
Feeding, compatibility, and care
Feed lightly and consistently—overfeeding clouds water and stresses plants, shrimp, and fish. Always research adult size and temperament before stocking to prevent predation and keep community dynamics stable.
Quarantine & acclimation checklist
- Quarantine new livestock for 7–14 days and observe for disease.
- Float bag or drip-acclimate to match temperature and parameters.
- Add animals gradually, allowing the filter’s bacteria to adapt between batches.
Preventing algae: balance, cleaning, and routine
Algae growth is a symptom — and balance is the cure: meter light, nutrients, and filtration to steady the system. A predictable routine keeps water clear and lets plants thrive. Small, consistent steps protect the look and health of your tank.
Light, nutrients, and CO2 equilibrium
Keep light, nutrients, and CO2 in sync. Excess of any one invites algae, while balance favors healthy plants. Start with a conservative photoperiod and raise it slowly as growth stabilizes—adjust in 15–30 minute steps and observe plant response.
Targeted cleaning tools and time-saving tips
Use targeted tools—razor scrapers, a soft toothbrush, and a fine airline—to clear glass, rocks, and crevices without harming roots. Add a small roster of algae-eaters (Amano shrimp, nerite snails) where appropriate to help control growth naturally.
- Check light duration first, then nutrient dosing and CO2 if algae persists (light → nutrients → CO2 → maintenance).
- Clean filters on schedule but avoid over-sanitizing so beneficial bacteria stay intact.
- Prune plants before they shade themselves; open canopies improve light distribution and flow.
- Feed fish modestly and remove uneaten food to cut nutrient spikes and reduce algae fuel.
Routine beats emergency. A short weekly check—glass, plants, filter, and parameters—prevents most algae problems and keeps the aquascape looking its best.
Compare kits: beginner-friendly to premium builds
Not every size or price point fits every hobbyist. Decide whether you want a simple starter or a statement aquascape tank before you order. Size, included lighting, and glass clarity shape both the look and the maintenance you’ll perform.
Compact cubes and 7.13 gal options
Compact elegance: Small kits — like common 7.13 gal cube bundles — pack a matched light and filter into an easy 11.8‑inch footprint. These kits are best for beginners or tight spaces: low maintenance, focused view, and quick setup.
10 gal starter scapes
Room to grow: A 10 gallon starter kit gives more planting room and hardscape flexibility while keeping costs and maintenance reasonable. Look for bundles that balance a suitable light and filter so plants and livestock thrive sooner.
30–71 gallon rimless showpieces
Statement displays: Larger rimless kits (30–71 gal) provide sweeping sightlines and an ultra clear view for dramatic rock work and richer plant compositions. These sets often require stands, more robust filtration, and a longer commitment to maintenance—but they deliver cinematic gardens and smoother fish movement.
- Compare what’s included: glass clarity, lighting specs, filter type, and whether a stand or hood is provided.
- Check stock often—popular kit sizes and LED packages sell out quickly after restocks.
- Order stones and matching lighting together so color temperature and tone feel cohesive in the final view.
Tip: create a quick comparison table before you buy—size, included items, estimated price range, and maintenance level—to match a kit to your goals and experience.
Buying smart in the United States
Timing your purchase around restocks can mean the difference between grabbing the size you want and waiting weeks.
Restocked kits, price match options, and payment plans
Set stock alerts on vendor pages and sign up for newsletters so you receive restock notices the moment popular kits return—high-demand sizes and LED packages often sell out quickly.
Use price-match policies when available but read exclusions carefully; some sellers exclude certain brands or charge for shipping. Consider payment plans (installment options) to spread cost across stands, substrate, and hardscape without delaying your project.
Domestic shipping, international notes, and live plant considerations
For U.S. buyers, domestic shipping shortens transit and reduces the risk of damage for glass tanks and heavy items. Verify lead times on stands and drilled tanks so your setup schedule stays on track.
International listings may exclude live plants—if you spot a good product abroad, buy the tank domestically and source shrimp and plants locally to protect timing and health.
- Check carrier packaging, handling, and insurance for tanks before you order.
- Confirm seller hours and response times for pre-order questions.
- Use a pre-order checklist—stand, substrate, hardscape, lighting, filter—to ensure your package arrives complete.
From box to brilliance: assembly, setup, and first 30 days
Getting a new tank live is about careful steps, not speed. Spend time on day one to plan placement, cable runs, and where tools will live—this small pause prevents rework and preserves your design.
Dry layout to planting workflow
- Before you fill: unbox the aquarium kit, set the stand level, and dry‑fit the light, filter, and hoses to confirm reach and cable paths.
- Hardscape first: build and photograph several dry layouts of stones and wood; small rotations often reveal the strongest lines.
- Plant in stages: foreground carpets first, midground clusters next, then background stems—use tweezers and scissors for precise placement and minimal substrate disturbance.
Initial water treatment, cycling, and livestock timing
Fill slowly (pour over a plate or bag to avoid displacing the layout). Dose water treatment at every fill to neutralize chlorine and chloramine. Start cycling with seeded media or a bacterial starter and test ammonia and nitrite every few days; only add shrimp or fish after both read zero.
- Timed routine: establish a modest light schedule (6–8 hours) and increase gradually as plants root to avoid algae surges.
- Maintenance items to order early: spare filter media, tweezers, scissors, a gravel vacuum, and water test kits so you’re ready when adjustments are needed.
- Patience pays: resist rushing—steady progress in the first 30 days builds stability that keeps maintenance easier over time.
“Small, deliberate steps at setup save time and trouble later.”
Conclusion
Wrap up your plan by choosing durable, compatible combinations that let you enjoy the view more than the chores.
Let your selected style guide gear and plant choices, then refine with simple routines that make care intuitive and results long‑lasting.
Watch U.S. retailers for restocks of rimless tanks, WRGB lighting, and hardscape so you can pick the exact size and ultra clear displays that fit your space and workflow. Use price-match promotions or payment plans when they help you complete the order without compromising key items.
Trust proven combinations: balanced lighting, capable filtration, and supportive substrate keep growth steady and reduce surprises.
Next steps: choose a kit → order substrate & hardscape → set up and dry‑fit → plant and cycle → add livestock gradually. Start thoughtfully, monitor progress, and enjoy each chapter as your aquascape matures.
FAQ
What comes in a typical aquascape aquarium kit and what do I need to add?
How do I choose the right tank size and placement for my room?
What kind of lighting do plants need and how long should lights run?
How does filtration affect water clarity and plant health?
Which substrates are best for planted layouts and root feeders?
What hardscape materials should I pick: Seiryu, Ohko, lava, or driftwood?
How do I plan plant layout for foreground, midground, and background?
Can I keep shrimp and nano fish together, and how do I manage bioload?
What steps prevent and control algae without chemicals?
How do I cycle a new tank and when can I add fish or shrimp?
Are plug-and-play kits good for beginners, or should I build a custom system?
What maintenance schedule keeps a planted tank healthy?
How do shipping and live plant orders work in the United States?
What tools and supplies should I order alongside my kit?
How do I design a nature-style layout versus a Dutch or Iwagumi scape?