Transform Your Reef Tank with Perfect Lighting Solutions

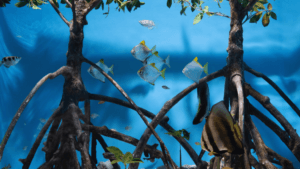
Discover the power of reef tank lighting to create a thriving and visually stunning aquatic environment. Proper lighting is essential for the health and growth of corals. They rely on photosynthetic zooxanthellae for energy. The right spectrum and intensity of light can make all the difference in the appearance and vitality of your saltwater aquarium.

LED aquarium lighting has become increasingly popular. It’s energy efficient, customizable, and operates cool. You can tailor your lighting setup to the specific needs of your coral species. For LPS corals, 50-100 watts of LED lighting per 24″ square area is recommended. SPS-dominated tanks may require up to 200 watts for optimal growth.

When selecting your reef tank illumination, consider the absorption peaks of chlorophyll A. It’s found in corals at 440nm (violet light) and 675nm (red light). Aim for a color temperature between 8,000-10,000K to replicate the sun’s natural white light. Or explore the vibrant blues of 15,000-25,000K for a deep ocean aesthetic. Experiment with the Photosynthetically Active Radiation (PAR) intensity, which can range from 50 PAR in low light setups to an impressive 1200 PAR in bright tanks.

Key Takeaways

  • Proper reef tank lighting is vital for coral health and growth
  • LED aquarium lighting offers customizable color spectrums and energy efficiency
  • Consider the absorption peaks of chlorophyll A when selecting light spectrum
  • Aim for a color temperature between 8,000-10,000K for natural white light
  • Experiment with PAR intensity to optimize coral growth and coloration

Understanding the Importance of Reef Tank Lighting

Lighting is key to a reef tank’s health and beauty. It lights up the colors of corals and fish. It also helps the delicate ecosystem in the tank. Creating a thriving marine environment means knowing how light affects coral growth and photosynthesis.

Today, over 90% of hobbyists choose LED lighting for reef tanks. LEDs offer a customizable spectrum for different corals. They also provide high levels of PAR, up to 1200 at the top and 200 at the bottom.

How Lighting Affects Coral Growth

Corals need a relationship with zooxanthellae, tiny algae for energy. The light spectrum, with violet and red, is key for photosynthesis. Each coral species has its own light needs:

  • SPS corals need high PAR levels, 200-400 µmol/m²/s
  • LPS corals do well with moderate PAR, 100-200 µmol/m²/s
  • Soft corals prefer lower PAR, 50-150 µmol/m²/s

The Role of Photosynthesis in Marine Life

Photosynthesis lets zooxanthellae turn light into energy for corals. This is the heart of a healthy reef. Good lighting ensures zooxanthellae get the right light for photosynthesis, helping corals grow and stay colorful.

“Lighting is considered one of the most expensive aspects of maintaining a reef tank, but it is also one of the most important investments for the health and beauty of your aquatic ecosystem.”

Light Spectrum and Its Impact on Aquatic Health

Choosing the right marine aquarium light fixtures means looking at the light spectrum. A wide blue spectrum, from 390 to 470 nanometers, is best for corals. This range is not visible to humans, making PAR a better measure. Brands like Ecotech and Kessil offer customizable lighting. Brands like ReefBrite and Dymax are more affordable for soft corals and LPS corals.

Knowing the importance of lighting in reef tanks helps aquarists create a vibrant underwater world. By picking the right light spectrum for reef tanks, they can showcase the beauty and diversity of marine life.

Types of Reef Tank Lighting Systems

There are many reef-safe lighting systems for your tank. Each has its own benefits. The right high-intensity reef lighting is key for a healthy, vibrant tank.

LED lighting is the top choice, with 99.9% of owners preferring it. It’s energy-efficient, doesn’t heat up much, and is easy to control. You can pick from 50-watt, 90-watt, or 150-watt LEDs to fit your tank’s size and needs.

LED Lighting: A Modern Solution

LED lights are super controllable. You can adjust the light’s duration, intensity, and color for your corals. With the right setup, these lights can prevent coral health problems and make your tank look amazing.

LEDs offer many shimmer effects. You can choose from strong to no shimmer. This lets you set the mood of your tank just right.

T5 Fluorescent Fixtures for High Output

T5 fluorescent fixtures are another option. They give a good spectrum and color without shadows. But, they don’t have the shimmer effect that LEDs do.

They also don’t have timers. This makes it harder to schedule their use.

Metal Halide Lights: The Classic Choice

Metal halide lights are old-school but some like them. They have a natural spectrum and look good. They promote great coral growth and color.

But, they’re hot and use a lot of energy. This is more than LEDs.

When picking your lighting, think about your tank’s size, how much light it needs, and how to mount it. Mixing T5 and LED lights can be a good choice for some tanks. Remember, the cost and effectiveness of lighting depend on wattage. Choose based on your tank’s needs and your budget.

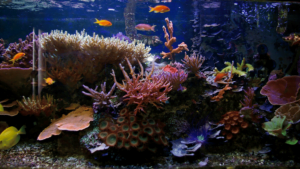
Choosing the Right Light Spectrum for Your Reef

Creating a thriving reef tank starts with the right light spectrum. The best spectrum depends on your corals and the look you want. Let’s explore light spectrums to find the perfect choice for your underwater world.

Blue vs. White Light: What’s Best?

In reef tank lighting, blue and white light are key. Blue light, from 75% to 100%, helps corals grow and glow. White light, from 0% to 10%, balances colors and keeps corals healthy. The right mix of blue and white light makes your reef tank stunning.

Full Spectrum Options for Vibrant Colors

For a colorful reef tank, full spectrum lighting is best. The 10,000K White spectrum, with 85% to 100% blue and 80% to 100% white, is great. The AquaBlue Plus spectrum, with 85% to 100% blue and 15% to 30% white, also promotes growth and color. These options make your corals shine, creating an amazing underwater scene.

“The beauty of a reef tank lies in the interplay of light and life. Choosing the right spectrum is like painting with nature’s palette, bringing out the true essence of your aquatic masterpiece.”

Understanding PAR (Photosynthetically Active Radiation)

When picking lighting, knowing PAR is key. PAR is the light used for photosynthesis, which powers coral growth. Soft corals need 50 to 150 PAR, LPS corals 50 to 150 PAR, and SPS corals 200 to 500 PAR. Actinic and daylight LED lighting provide the right PAR levels for your corals to thrive.

About 70-80% of corals need zooxanthellae for survival and growth. The right light spectrum and PAR levels support this relationship. This ensures your reef tank stays healthy and beautiful.

Setting Up Your Lighting Schedule

programmable reef tank lights

Creating the perfect reef tank lighting schedule is key for a healthy aquarium. It helps corals grow well and keeps your marine friends happy.

Importance of a Consistent Light Cycle

Consistency is vital for reef tank lighting. Corals and photosynthetic organisms need a steady light cycle. This helps them stay healthy and perform well.

Suggested Lighting Durations for Reef Tanks

Reef tanks need 8 to 12 hours of light daily. A gentle ramp up and down simulates sunrise and sunset. The blue spectrum, which is essential for corals, should start from 0 to 100% in 1-2 hours and stay on for 8-10 hours.

Here’s a recommended lighting schedule:

  • Ramp up period (sunrise): 2 hours
  • Main photo period (daylight): 8 hours
  • Ramp down period (sunset): 2 hours

“Balancing light intensity is key for a community reef tank. A gradual approach and monitoring for optimal growth is essential.” – Reef Chasers

Using Timers for Convenience and Precision

Programmable reef tank lights and lighting timers for aquariums have changed how we manage lighting. These tools let you set exact on and off times and adjust light intensity and spectrum. Timers help keep your light cycle consistent without manual adjustments.

When setting up your lighting schedule, think about what your corals and invertebrates need. Some might need more or less light. Research and adjust to meet their needs. This will make your reef tank a stunning and thriving place.

Best Practices for Reef Tank Lighting

Creating the perfect lighting for your reef tank is key for your aquatic ecosystem’s health. By following best practices, your corals and marine life will thrive. Let’s look at some strategies for ideal reef tank lighting.

Avoiding Light Shock in Corals

Preventing light shock in corals is vital. Corals don’t like sudden light changes, which can stress and harm them. To avoid this, make lighting changes slowly.

When starting a new tank or adding new corals, begin with low light. Then, slowly increase it. This lets corals adjust to their new home.

Adjusting Light Intensity Over Time

As corals grow, their light needs change. It’s important to watch their growth and adjust light levels. Gradually increasing light ensures corals get what they need.

Remember, different corals need different lights. Research and adjust your lighting for your corals’ specific needs.

“Proper lighting is the key to unlocking the vibrant colors and stunning growth of corals in a reef tank.”

Regular Maintenance of Light Fixtures

Regular maintenance keeps light output high and prevents algae. Clean your lighting fixtures often. Replace bulbs or LED modules as needed to keep light consistent.

By keeping your lighting system in good shape, you create the best environment for your reef tank. This will make your tank a thriving, stunning aquatic paradise for years.

Innovations in Reef Tank Lighting Technology

smart lighting for reef tanks

The world of reef aquariums is always changing. New lighting technologies help corals grow and keep tanks healthy. Let’s look at some exciting new developments in reef tank lighting.

Smart Lighting Solutions for Aquarists

Smart lighting for reef tanks has changed how we care for our tanks. Modern LED systems can be controlled from phones or tablets. They give a full spectrum of light, perfect for coral health.

Companies like AI Hydra and Ecotech Radion are leading this change. They use advanced LED technology for customizable and efficient lighting. This new tech is better for corals and uses less energy than old bulbs.

Remote Monitoring and Adjustments

Automated systems like the Neptune Systems Apex Controller are key for reef tank care. They track water conditions in real-time. This helps keep the tank stable for corals and fish.

These systems also help with other tank tasks, like dosing and wave makers. They make it easy to create a smart aquarium. This setup helps corals grow and keeps the tank healthy.

UV Filters: Enhancing Water Quality

UV filters are great for clear water and fighting off bad bacteria. They use UV light to kill algae and bacteria. This keeps corals and fish healthy.

“The combination of smart lighting, remote monitoring, and UV filtration has transformed the way we approach reef tank maintenance. These innovations not only make our lives easier but also contribute to the long-term success and beauty of our aquatic ecosystems.”

The reef aquarium hobby is always getting better. We’ll see more advancements in lighting soon. These changes will lead to healthier, more colorful reef tanks, full of marine life.

How to Position Lights Effectively

Getting the right spot for reef tank lights is key to a healthy and beautiful aquarium. The place and height of your lights greatly affect your corals and marine life. Knowing how to position your lights helps you get even light and show off your corals.

Height and Distance from Water Surface

When setting up your reef tank lights, think about how high and far they are from the water. A study tested 50 lighting setups on a 24″ cube tank. It found that lights should be between 6″ to 20″ above the water for best results. Too close, and you get hot spots and wasted light. Too far, and your corals don’t get enough light.

Creating a Balanced Light Distribution

It’s vital to have even light for your corals to thrive. The study aimed for a light distribution with no more than 30% difference in light intensity. This ensures all parts of your tank get enough light. Aim for 250 PAR across the tank, with at least 150 PAR at the bottom and up to 350 PAR near the top.

Spotlighting Corals for Aesthetics

Lighting can also make your tank look amazing. By placing LED lights just right, you can make certain corals pop. Some corals look better under more intense light, so placing them near the top can be stunning. But, remember to adjust for each coral’s needs to avoid damage.

Getting your reef tank’s lighting just right takes time and effort. Keep watching your corals and adjust as needed. With patience and the right tweaks, you can create a vibrant underwater world that showcases marine life’s beauty.

Common Mistakes in Reef Tank Lighting

common reef tank lighting mistakes

Lighting is key to a healthy reef tank. It affects the health and growth of your fish and corals. Many beginners make mistakes that harm their tank.

One big mistake is overlighting. It can cause corals to lose their color and even die. Too much light makes them expel their algae. On the flip side, not enough light makes corals grow poorly and look dull.

Overlighting Issues and Consequences

Some people light their tanks too much because they don’t know what their corals need. For example, some corals do best in light with PAR values between 200 and 350. More light can make colors pop but also stress corals, leading to bleaching.

Underlighting Concerns for Coral Health

Underlighting is just as bad. It stops corals from growing and looking their best. Without enough light, they can’t make the energy they need. This leads to stunted growth, dull colors, and more disease.

Not Considering Tank Dimensions

Another mistake is not picking lights that fit your tank size. You should space LED lights 12-18 inches apart for even lighting. Ignoring your tank’s size can cause uneven light and harm your corals.

To avoid these mistakes, learn what your corals need and choose the right lights. T5 fixtures are good for SPS corals. By understanding your tank’s needs and using quality lights, you can create a vibrant reef home for marine life.

Using Colored Lighting for Aesthetics

Colored lighting can turn your reef tank into a stunning underwater world. Using different filters and night lights can make your corals look even more beautiful. It creates an amazing aquatic experience.

Corals and fish in reef tanks show off amazing colors, from bright neon greens to deep magentas. The lighting you pick greatly changes how these colors look. Fluorescent proteins in corals absorb blue-violet light and emit lower energy wavelengths like green, red, yellow, or orange, creating a captivating glowing effect.

Enhancing Coral Colors with Different Filters

To make your corals pop, a balanced light spectrum is essential. It should have peaks in violet, blue, and indigo wavelengths. Changing these spectrum peaks can really make your corals’ colors stand out under different lights. Most aquarium lights also have cool or warm white LEDs to show off the tank’s color pigments.

Every tank is different, and achieving the best coloration involves providing a customized light spectrum based on the corals present.

The Appeal of Night Lights in Reef Tanks

Night lights with dim blue or moonlight settings can make your reef tank look amazing. They mimic natural lunar cycles. These lights let you enjoy your aquarium’s beauty in the evening without disturbing your marine life.

Creating an Immersive Aquatic Experience

By choosing and adjusting your colored lighting for reef tanks, you can make an immersive aquatic experience. Trying out different filters and night lights lets you show off your corals and fish. It turns your aquarium into a living work of art.

Budgeting for Quality Reef Tank Lighting

cost-effective aquarium lighting options

When setting up your reef tank, lighting is key. It’s tempting to choose the cheapest options. But, quality lighting is vital for your tank’s health and beauty. Let’s look at how to budget for lighting without losing performance.

Cost vs. Benefit Analysis of Different Systems

Before buying, compare the costs and benefits of different lights. LEDs, for instance, cost more upfront than old-school fluorescent tubes. Yet, they save energy, last longer, and adjust to your tank’s needs. Their long-term savings and durability make them worth it.

Finding Affordable Options Without Compromising Quality

Finding the right balance between price and quality is key. Look for brands that offer good deals without cutting corners. Choose lights with adjustable settings and durable builds. Reading what other aquarists say can help you find reliable options.

“Investing in a quality lighting system is not just about aesthetics; it’s about creating a thriving environment for your reef inhabitants.”

Long-Term Savings with Energy-Efficient Choices

Choosing energy-efficient lights like LEDs can save you money over time. They use less power than old lights, cutting down on bills and carbon emissions. Plus, LEDs last longer, saving you money on replacements.

Lighting is a vital part of your reef tank. By budgeting for reef tank lighting smartly, you can have a beautiful and healthy tank without spending too much. Go for quality, energy-saving reef lights, and enjoy your underwater world for years.

Environmental Considerations for Reef Tank Lighting

As reef aquarium fans, we must think about our lighting’s environmental effect. Choosing eco-friendly options helps us reduce our carbon footprint. This way, we keep our tanks healthy for our underwater friends.

Energy Consumption and Efficiency Ratings

When picking lights for your tank, look at their energy use. LED lights are great because they use less power and let you adjust the color. They use up to 80% less energy than old lights, making them good for our planet.

Sustainable Practices in Lighting Choices

Being green with your tank’s lights is more than just picking efficient ones. Think about how long your bulbs last and recycle them when they’re done. Many companies have recycling for old bulbs, keeping bad stuff out of landfills.

“By making small changes in our lighting choices, we can collectively reduce the environmental impact of the reef aquarium hobby.” – Marine Conservation Society

Impact on Local Ecosystems and Preservation

It’s key for us to think about how our lights affect local reefs. Choose systems that mimic the sun’s natural cycle to keep corals healthy. Supporting local coral farms and avoiding wild corals helps protect reefs for the future.

Every choice we make towards greener reef tank lighting counts. By focusing on energy savings, green practices, and caring for marine life, we can enjoy our tanks. We also help make the world a bit greener.

Expert Recommendations for Your Reef Tank

Starting a reef tank journey? Getting expert advice is key. Top reef tank lighting brands like Kessil, AI, and EcoTech Marine offer quality products. They have a wide range of lighting options to match your tank’s needs.

Top Brands and Products in the Market

Exploring reef tank lighting, you’ll find many top products. The EcoTech Marine Radion XR15, Aqua Illumination Hydra TwentySix, and Kessil A360X are favorites. They balance light intensity and spread, perfect for all coral types.

Community Insights and Reviews

Looking at reef aquarium lighting product reviews online is helpful. Join forums and social media groups to learn from others. You’ll get tips on PAR values, tank sizes, and coral types.

Consulting with Reef Tank Professionals

For custom lighting advice, talk to reef tank experts. They know how to light your tank right. They consider your tank’s size, corals, and look you want. Their advice can save you time and ensure your reef is well-lit.

FAQ

What is the importance of lighting in a reef tank?

Lighting is key for a coral reef aquarium’s health and beauty. Corals need light for photosynthesis, thanks to zooxanthellae. The right light spectrum and intensity are vital for coral health and color.

How does the light spectrum affect coral growth?

The light spectrum, with violet and red wavelengths, is vital for coral photosynthesis. Blue light makes corals glow, while white light boosts growth. A full spectrum ensures healthy corals and bright colors.

What are the popular types of reef tank lighting systems?

LED lighting is favored for its control, energy use, and long life. T5 bulbs offer a strong spectrum and vibrant colors without shadows. Metal halide lights promote growth and color but use more energy and heat.

How many hours of light do reef tanks require per day?

Reef tanks need 8-12 hours of light daily, like natural daylight. Timers help control the light schedule, keeping the tank stable.

How can I avoid light shock in corals?

Slowly increase light intensity to avoid shocking corals. This lets them adjust without stress. Regular maintenance keeps light quality high and prevents algae.

What are the consequences of overlighting or underlighting a reef tank?

Too much light can bleach corals and grow algae. Too little light hampers growth and dulls colors. Choosing the right light for your tank size is critical for coral health.

How can I enhance the visual appeal of my reef tank with lighting?

Use colored filters to highlight coral colors and create stunning displays. Blue and actinic lights enhance fluorescent colors. Night lights with dim blue settings add a captivating ambiance.

What should I consider when budgeting for reef tank lighting?

Consider the long-term benefits and energy savings of quality lighting. LEDs may cost more upfront but save energy and last longer. Look for affordable, reliable brands.

How can I make environmentally-friendly choices for my reef tank lighting?

Choose energy-efficient lighting to reduce your tank’s environmental impact. Opt for high-efficiency fixtures and dispose of old bulbs responsibly. Support local ecosystems and preservation efforts.

What are some top brands and expert recommendations for reef tank lighting?

Look for top brands like Kessil, AI, and EcoTech Marine for quality lighting. Talk to the reefing community for advice and insights. Personalized recommendations can help tailor lighting to your tank’s needs.
exotic fish tanks
Explore Breathtaking Exotic Fish Tanks for Your Home
Transform a plain room into living art with a centerpiece that adds movement, color, and calm. A well-chosen...
Water parameters testing kit
Aquarium Setup Guide for Beginners
Dive into the world of aquarium basics and begin your Aquarium Setup with confidence. Setting up your first fish tank is exciting — it brings a miniature underwater world into your home and teaches the essentials of water care and tank management. Choosing the right tank size matters: options range from a compact 5-gallon desktop tank to a large 45-gallon display. Keep in mind a full tank’s weight adds up quickly — water alone is roughly 8.34 pounds per gallon, so a 45-gallon tank plus gravel and stand can be several hundred pounds; pick a sturdy location and check floor or stand capacity. Start with the right equipment: a reliable filter, an appropriately sized heater and thermometer, and aquarium lighting. You’ll also need water conditioner, substrate or gravel, and a few decorations or rocks for hiding places and background interest. Adding live plants improves appearance and helps maintain water quality. Key TakeawaysAquariums commonly range from 5 to 45 gallons — choose by space, budget, and the fish you want Essential equipment includes a quality filter, heater, lighting, and water conditioner Allow at least 48 hours for initial water stabilization (filter, heater, and dechlorination) but plan for a full biological cycling period of several weeks before stocking Choose tank size and placement carefully — weight and nearby power outlets matter Live plants enhance aesthetics and contribute to water quality and biological filtrationIntroduction to the Fascinating World of Aquariums An Aquarium Setup brings a slice of the underwater world into your home and makes an inspiring, living focal point. Whether you want a relaxing hobby, a teaching tool, or a planted aquascape, understanding the basics will help you create a healthy aquarium that fits your space and lifestyle. What is an aquarium? An aquarium is a sealed or open container that holds water, fish, plants, and other aquatic life to create a small, balanced ecosystem. Aquariums come in many sizes — from tiny desktop tanks to large room-sized displays — and each size affects equipment, stocking, and maintenance needs. Benefits of keeping an aquarium Keeping an aquarium offers many benefits: it can reduce stress, improve mood, and add unique visual interest to your home. Learning water care and tank maintenance builds responsibility and an appreciation for aquatic environments, and watching fish can even have measurable calming effects. Types of aquariums Choose the type of aquarium based on your experience and goals. Freshwater aquariums are the most beginner-friendly and work well with community fish like guppies, tetras, and corydoras. Saltwater aquariums unlock colorful marine species and reef life but require more advanced water chemistry control. Planted aquariums focus on aquatic plants (Java fern, Anubias, Amazon sword) and create a lush, natural environment that supports biological filtration.Aquarium TypeDifficulty LevelSuitable ForFreshwater Beginner Tropical community fish, easy-care plantsSaltwater Advanced Marine fish, corals, invertebratesPlanted Intermediate Aquatic plants, small schooling fishFor most beginners, a 20–30 gallon freshwater aquarium is an excellent choice: it’s large enough to provide stable water conditions and room for a small community of fish while still being manageable for setup and maintenance. Remember that preparing a tank for fish includes a biological cycling period — typically 4–6 weeks — so plan your Aquarium Setup timeline accordingly. Choosing the Right Aquarium for Your SpacePicking the right tank means balancing size, location, and your lifestyle. Your choice affects how the aquarium looks in your home and how easy it is to maintain water quality and temperature for healthy fish. Understand the weight: water weighs about 8.34 pounds per gallon. Add substrate and decorations (roughly 1.5–2 pounds per gallon) plus the glass and stand—so a 45-gallon tank full of water and gravel can weigh several hundred pounds. Make sure the floor or stand can support the combined weight before you fill the aquarium. Location matters. Place the tank away from direct sunlight and heat sources to avoid temperature swings and algae problems. Most tropical freshwater fish do well between about 75° and 80°F, but always match temperature to the species you plan to keep. Plan equipment access: position the tank near a grounded outlet for filters, heaters, and lighting, and make sure there’s room to service the aquarium. Space and maintenance needs depend on the aquarium type. Freshwater setups are the easiest for beginners; popular starter fish include:Guppies Tetras Betta fish Corydoras catfish Zebra DaniosIf you move to saltwater later, consider hardy starter species like clownfish, damselfish, gobies, or blennies—saltwater tanks typically require tighter water chemistry control and more equipment. Essential Equipment for Your Underwater Ecosystem Creating a thriving aquarium requires the right equipment—choose gear that matches your tank size, the species you plan to keep, and how hands-on you want to be. The right setup makes maintaining water quality and a stable environment much easier. Filtration Systems Filtration systems remove physical debris, support beneficial bacteria, and help keep water chemistry stable. Aim for a filter that turns over the tank volume several times per hour—many hobbyists use a 3–5x turnover guideline for lightly stocked community tanks, while higher bio-loads may need faster turnover. For a 20-gallon tank this often translates to a filter rated around 60–100 gph; canister or hang-on-back filters are popular for larger tanks, while small internal filters suit desktop tanks.When to choose canister/external: larger tanks, heavy stocking, quiet operation. When to choose internal/hang-on-back: smaller tanks, budget setups, easier maintenance.Heaters and Thermometers Aquarium heaters keep the water within a stable temperature range. A common rule is 3–5 watts per gallon for tropical tanks as a starting point—adjust up if the room is cool or the tank is large. Always use a reliable thermometer and consider a heater with a built-in thermostat to avoid dangerous swings. Lighting Options Lighting showcases fish colors and supports plant growth. For basic fish-only tanks, modest LED fixtures are energy-efficient and low-heat. For planted tanks, focus on PAR (photosynthetically active radiation) or lumens suitable for your plant selection instead of relying solely on watts-per-gallon (the watts rule is outdated for modern LEDs). High-light planted tanks need stronger fixtures and possibly a CO2 system. Air Pumps and Decorations Air pumps and air stones increase surface movement and oxygen exchange—useful in heavily stocked tanks or where additional circulation is needed. Decorations—gravel or other substrate, rocks, driftwood, and background pieces—create hiding spots and visual depth. Use an appropriate substrate depth for plants and species (many hobbyists use 1–2 inches for basic setups, with about 1–2 lbs per gallon of substrate as a guideline), and position larger decorations toward the back to create a natural background and open swimming space up front.EquipmentRecommendationFilter Turnover several times/hour (3–5x for light loads; choose capacity by tank and stocking)Heater Start around 3–5 watts per gallon for tropical tanks; use thermostat controlLighting LED preferred; choose PAR/lumen level by plant needs rather than strict W/galSubstrate 1–2 lbs per gallon typical; deeper for rooted plantsUnderstanding Water Chemistry and Parameters Maintaining correct water chemistry is the foundation of a healthy aquarium. Key parameters to monitor are pH, ammonia, nitrite, nitrate, and water hardness (GH/KH). Regular testing lets you spot issues early and keep the aquarium environment stable for fish and plants. pH measures how acidic or alkaline the water is. Most common tropical freshwater species do well in a pH range near 6.5–7.5, but individual needs vary—research your chosen fish and plants and avoid sudden pH swings. Carbonate hardness (KH) acts as a buffer that helps hold pH steady. Ammonianitrite are toxic even at low concentrations. The safe target for both is 0 ppm; sustained measurable levels can damage gills and reduce oxygen transport. Nitrate is less toxic but should be kept low (many hobbyists aim for under ~20 ppm for sensitive communities) because high nitrate over time can stress fish and affect growth and breeding. Water hardnessParameterIdeal RangeEffectsAmmonia 0 ppm Toxic; causes gill and respiratory stressNitrite 0 ppm Impairs oxygen transport; toxicNitrate <20 ppm (target varies by species) Chronic stress, impacts growth and breedingpH 6.5–7.5 (species-dependent) Too high/low causes stress; match species needsGH 4–8 dGH (general guideline) Affects osmoregulation; varies by speciesHow to test and correct issues: use reliable test kits or strips for regular monitoring (weekly at minimum during setup or after changes). If ammonia or nitrite appears, perform partial water changes (10–20%) and reduce feeding; add biological enhancers (beneficial bacteria products) to speed recovery. To raise GH/KH, use aquarium-specific remineralizers; to lower hardness or pH slowly, use RO/DI water mixed with tap water or purpose-made buffers—always change parameters gradually and retest. Make sure you dose products according to instructions and consider the needs of both fish and live plants when adjusting levels. Aquarium Basics: Setting Up Your Tank Setting up your aquarium is the hands-on part of your Aquarium Setup — a few careful preparation steps will create a stable, attractive environment for fish and plants. Follow these steps to position, dress, and fill your new aquarium correctly. Preparing the Tank Start by rinsing the tank with warm water only — never use soap or household cleaners because residues can be toxic to fish. Place the tank in its final location on a sturdy, level stand that can support the filled weight. Make sure the floor and stand are rated for the combined weight of glass, water, substrate, and decorations. Double-check the place for nearby grounded outlets for the filter, heater, and lighting, and avoid spots with direct sunlight or large temperature swings. Adding Substrate and Decorations Choose substrate based on your goals: inert gravel or sand for community tanks, nutrient-rich substrate for planted aquariums. For a 20-gallon tank you’ll typically need about 30–40 pounds of substrate (the common guideline of ~1.5–2 lbs per gallon is a useful starting point) — rinse it thoroughly until the water runs clear to remove dust. Arrange larger items like rocks and driftwood toward the back to build a natural background and leave open swimming space in front. Use caves or plants to provide hiding spots. Place heavier decorations directly on the substrate and avoid sharp edges that could damage fish or silicone seams. Filling the Tank and Treating Water When you fill aquarium water, pour slowly onto a plate or saucer resting on the substrate to avoid disturbing the layout. Treat tap water with a quality water conditioner to remove chlorine and chloramine and to detoxify metals. Install the heater and thermometer, aim for a general starting temperature around 76–78°F for many tropical community fish (adjust for species), and make sure the heater is fully submerged and functioning before adding livestock.Clean tank thoroughly with warm water only Add substrate (≈1.5–2 lbs per gallon) and rinse well Position decorations for aesthetics and fish safety; create background depth Fill aquarium slowly onto a plate; treat water with conditioner Install filter, heater, and thermometer; verify operationWith equipment running and water treated, your tank is ready to begin the cycling process. For fishless cycling, add a source of ammonia (fish food or pure ammonia) and beneficial bacteria products to jump-start the nitrogen cycle — follow product instructions and monitor parameters closely during the several-week setup period. Cycling Your Aquarium: The Crucial First StepAquarium cycling establishes the beneficial bacteria colonies that convert toxic waste into less harmful compounds — the core of the nitrogen cycle. Ammonia (from fish waste and uneaten food) is converted to nitrite by one group of bacteria, and nitrite is then converted to nitrate by another group. Without a completed cycle, ammonia and nitrite can build up and harm fish. How long it takes: most new aquarium setups form a stable bacterial community in about 4–8 weeks, depending on temperature, stocking, and whether you seed the tank with bacteria. During cycling, maintain stable conditions (avoid big daily pH or temperature swings). Aim for comfortable tropical temperatures around 76–82°F for most setups — higher temperatures speed bacterial activity but can stress some fish and plants, so match the temperature to your target livestock. Testing schedule and safe thresholds: test ammonia, nitrite, and nitrate regularly — every few days during active cycling, then weekly once established. The safe targets are 0 ppm for ammonia and nitrite; nitrates will rise as the cycle completes and are ideally kept below ~20 ppm for sensitive communities. If ammonia spikes above ~0.25–0.5 ppm, perform a partial water change (10–20%) and reduce any sources of ammonia (feed less, remove decaying matter).ParameterAcceptable Range / GoalTesting Frequency (during cycle)Ammonia 0 ppm (action if >0.25–0.5 ppm) Every 2–3 daysNitrite 0 ppm (end goal) Every 2–3 daysNitrate Detectable during cycle; keep <20 ppm for sensitive tanks Every 3–7 daysTwo common cycling methods:Fishless cycling (recommended): add a controlled ammonia source (pure ammonia or a measured amount of fish food) and optionally a bottled beneficial bacteria product to establish bacteria without exposing fish to toxins. This method is kinder and allows you to bring ammonia/nitrite to measurable levels for bacteria to colonize safely. Fish-in cycling (less recommended for beginners): add a few hardy fish and monitor carefully. Keep feeding minimal, test frequently, and perform small, regular water changes to keep ammonia and nitrite in safe ranges.Practical timeline example (fishless): Day 0 — set up tank, add substrate, start filter and heater; Day 1 — dose ammonia or fish food and add bacteria starter; Week 1–2 — monitor levels, add bacteria as directed; Week 3–6 — watch ammonia and nitrite peak and fall; when ammonia and nitrite are consistently 0 and nitrates are present, the tank is cycled and ready for gradual stocking. Throughout, make sure you adjust only one parameter at a time, perform partial water changes as needed, and avoid rapid temperature swings. Selecting Fish for Your AquariumChoosing the right fish is vital to a healthy Aquarium Setup. Think about tank size, water parameters, temperament, and long-term adult size to create a compatible, low-stress community. Popular Beginner-Friendly Fish Species These species are forgiving and make great first fish for a freshwater aquarium:Guppies — colorful, livebearers, easy to feed Tetras (neon, cardinal) — small schooling fish that thrive in groups Bettas — bright and hardy, best kept singly or in carefully planned communities Corydoras catfish — peaceful bottom-dwellers that help clean the substrateFor saltwater beginners, hardy options include clownfish, damselfish, gobies, and blennies — but note that saltwater tanks generally require tighter water chemistry control. Compatibility Considerations — Do / Don’tDo check temperament: avoid mixing aggressive species with peaceful community fish. Do match water needs: schooling species prefer consistent temperatures and pH suited to their group. Do consider adult size: plan stocking around full-grown fish, not juvenile size. Don’t overcrowd: avoid impulse additions — add fish slowly over weeks to let filtration and bacteria adjust. Don’t mix very different water types (e.g., freshwater and saltwater species).Stocking Guidelines and Quick Reference Stock carefully — understocking is safer than overstocking. Here are common minimums and group suggestions for beginner species:Fish TypeMinimum Tank SizeGroup SizeGuppies 10 gallons 3–5Neon/Cardinal Tetras 20 gallons 6+Bettas (male) 5–10 gallons 1 (or community with compatible species)Goldfish (common) 20–50 gallons per fish 1–2 (varies by species)Quick match tip: guppies and tetras prefer similar warm, slightly acidic to neutral freshwater; corydoras like soft substrate and will appreciate a group; goldfish need much larger, cooler tanks and produce more waste. Before buying, make sure you research each species’ temperature, pH, and hardness needs and use a compatibility chart or tool to double-check pairings. Introducing Live Plants to Your Aquatic EnvironmentAdding live plants turns your aquarium into a living, breathing underwater garden. Plants uptake carbon dioxide and some nitrogenous waste, help stabilize water chemistry, provide shelter for fish, and improve the natural appearance of your tank while contributing to biological filtration. Choose plants based on light needs and maintenance level. Low‑light, easy-care options for beginners include Java fern and Anubias (attach to wood or rocks) and Cryptocoryne (rooted). For mid- to high-light setups, Amazon sword and stem plants grow faster and fill space quickly. Lighting for planted tanks should be matched to plant needs. LED fixtures are efficient and run cool; rather than relying only on watts-per-gallon (an outdated rule for modern LEDs), consider PAR or lumens and the plant types you want. As a general guideline, aim for 8–10 hours of light daily for many planted tanks, reducing hours slightly if you see algae problems or increasing light intensity for demanding species. Fertilizers keep plants healthy: choose substrate fertilizers for rooted plants, root tabs for heavy root feeders, or liquid fertilizers for regular dosing through the water column. If you want faster growth and a fuller planted look, consider CO2 injection (pressurized CO2) or liquid carbon products for lower-tech tanks — dose carefully and monitor water parameters.Improves water quality and oxygen dynamics Provides shelter and breeding sites for fish Enhances natural appearance and background depth Contributes to biological filtration and nutrient uptakeTiming and setup tips: allow planted layouts to settle before heavy stocking — many hobbyists wait 2–3 weeks after planting before adding fish, though longer is better if you’re establishing a robust plant system. Make sure you check pH, GH/KH, and nitrate levels before stocking and adjust slowly. To minimize algae, balance light, nutrients, and grazing pressure (snails or algae-eating fish) and avoid direct sunlight on the tank.Plant TypeLight RequirementGrowth RateDifficultyJava Fern Low to Medium Slow EasyAnubias Low to Medium Slow EasyAmazon Sword Medium to High Moderate ModerateCryptocoryne Low to Medium Slow EasyFeeding Your Fish: Proper Nutrition and SchedulesFeeding your fish the right foods on a consistent schedule is essential for a healthy aquarium. Overfeeding is one of the most common mistakes and leads to poor water quality, algae, and sick fish—so aim for measured, species-appropriate portions. Adult community fish typically do well with one feeding per day; younger or fast-growing fish may need 2–3 small feedings. Offer only what your fish can fully consume in about five minutes and remove uneaten food promptly to prevent ammonia spikes. Different species have different dietary needs: herbivores need more plant-based matter, omnivores benefit from a mix, and carnivores require protein-rich foods. As a starting guideline, many hobbyists feed roughly 1%–3% of a fish’s body weight per day (adjust by species and activity). For nocturnal species, feed in the evening when they are active. Provide nutritional variety: use quality flakes or pellets as a staple, supplemented with frozen or freeze-dried foods, algae wafers for herbivores, and occasional live or frozen protein treats. Tailor the feeding schedule to your tank’s inhabitants and observe appetite and waste as guides to adjust portions.Fish TypeFeeding FrequencyFood Amount / NoteGuppies Once daily Small portions; variety of flakes and micro pelletsTetras Once daily Consumed within ~5 minutes; feed in small amountsBettas Once daily (or 5x/week) Protein-rich pellets or frozen foods; avoid overfeedingYoung Fish / Fry 2–3 times daily Small, frequent portions; appropriate-sized foodDo not overfeed—it’s safer to underfeed than overfeed. Adult fish can sometimes tolerate a missed meal, but juveniles need more consistent feeding. Monitor your fish and tank parameters; if you see increased waste or rising ammonia/nitrite, reduce food immediately. With a good feeding schedule and balanced nutrition, your fish will thrive and your aquarium water will stay cleaner. Regular Maintenance and Care RoutinesConsistent maintenance keeps your aquarium healthy, your water clear, and your fish thriving. Use a simple calendar of daily, weekly, and monthly tasks to make upkeep manageable and ensure filtration and water chemistry stay stable. Maintenance calendar (quick)Daily: Check fish for unusual behavior, top off evaporated water, and make sure equipment (filter, heater, lights) is running. Weekly: Test water parameters (ammonia, nitrite, nitrate, pH) and remove 10–20% of the water for a partial change as needed; siphon the substrate to remove debris. Monthly: Rinse mechanical filter media in removed tank water, replace chemical media if required, trim plants, and deep-clean glass or background as needed.Water changes and substrate cleaning Regular partial water changes remove dissolved wastes and replenish trace elements. A common approach is 10–25% weekly or 20–25% every 2–4 weeks depending on stocking and nitrate levels—adjust to your tank’s needs. Use a gravel vacuum to remove uneaten food and waste from the bottom; make sure you vacuum gently around plants and avoid removing too much beneficial substrate if using planted or seeded media. Filter care and filtration tips Filters are the heart of aquarium filtration—maintain them to protect beneficial bacteria. Clean mechanical media (sponges, pads) in tank water you remove during a water change to avoid killing bacteria with chlorinated tap water. Replace chemical media (activated carbon, resins) on the schedule recommended by the manufacturer (commonly every 4–6 weeks). Biological media should usually be left alone unless damaged—keep it wet and in tank water while cleaning other parts. Monitoring fish health and environment Watch fish daily for appetite, unusual swimming, or visible signs of illness. Keep tank temperature steady (many tropical community fish do well between 74–82°F / 23–28°C) and check the thermometer after maintenance. Test water weekly with a reliable test kit and act quickly on out-of-range readings: partial water changes, reducing feeding, and checking filter flow are common corrective steps.Use a test kit weekly (API MASTER TEST KITS or similar) When cleaning filter media, rinse in removed aquarium water — never tap water Keep spare replacement media and basic supplies on hand (carbon, replacement pads, water conditioner) Make sure you verify heater and thermometer after major maintenanceRegular, predictable maintenance prevents most issues. By testing water, caring for filters, and observing fish behavior, you’ll maintain a stable home and reduce the chance of surprises. Troubleshooting Common Aquarium Issues Aquarium problems can occur even with careful care. The most important tool for prevention and diagnosis is regular testing of water parameters (pH, ammonia, nitrite, nitrate) and observing fish behavior. Below are common symptoms, likely causes, and clear actions to fix them.SymptomLikely CauseActionCloudy or green water Free-floating algae bloom (excess light or nutrients) Reduce lighting hours/intensity, cut feeding, perform a 20–30% water change, consider an algae-eating cleanup crew; test nitrates and phosphates.Brown film on glass or decorations Diatoms (common in new aquariums) Light scrubbing, regular water changes, and patience; diatoms often decline as the tank matures.Fish gasping at surface Low oxygen, high ammonia, or chlorine in tap water Test ammonia and nitrite immediately; increase surface agitation (filter/outflow), perform a partial water change, and make sure water was treated with conditioner to remove chlorine/chloramine.High ammonia or nitrite readings Incomplete cycle, overfeeding, or overstocking Do a 10–30% water change, reduce feeding, check filter function, add beneficial bacteria boosters if desired, and test daily until levels drop.Persistent algae on plants Light/nutrient imbalance or low plant competition Adjust light duration (try 7–8 hours), dose appropriate fertilizers carefully, add fast-growing plants or algae grazers, and avoid direct sunlight.Consolidated routine fixes and checks:Test water weekly (more often if issues arise) and record results to spot trends in levels. Perform partial water changes routinely—10–25% weekly is a common approach; adjust frequency based on stocking, nitrate readings, and tank demands. Quarantine new fish for 2–4 weeks in a separate tank to prevent introducing disease to your display. When treating problems, change only one variable at a time (e.g., light or feeding), and retest to assess the effect.If you see a problem, act quickly but calmly: test first, then apply the least invasive correction (partial water changes, reduce feeding, improve filtration). Make sure you document what you change so you can repeat successful fixes and avoid compounding issues. A stable environment and consistent care are the best defenses against most aquarium problems. Conclusion Starting the aquarium hobby brings a living piece of nature into your home and rewards careful planning and consistent care. Create a realistic action plan: choose an appropriate tank size, set up reliable equipment, and learn to manage water quality and stocking over time. Quick starter recommendations: for most beginners a 20–30 gallon freshwater aquarium is a practical balance of stability and manageability; a larger 55-gallon tank is also excellent if you have the space and support. When planning, account for glass, substrate, decorations, and water weight so your stand and floor can safely carry the load. Successful fish keeping depends on steady routines more than perfect knowledge: pick the right filters, maintain regular water testing and changes, and choose fish that match your tank’s conditions. Adding live plants improves the tank’s appearance and supports biological filtration, but plan their lighting, substrate, and nutrient needs before stocking heavily. Actionable next stepsChoose your tank size (20–30 gal recommended for beginners) and confirm the place and stand can support the filled tank. Gather essential equipment: filter sized for your tank, heater + thermometer, LED lighting, substrate, and a water test kit. Set up and start the tank, then cycle it (fishless cycling recommended) — expect 4–6 weeks for a stable bacterial community. Stock slowly, research each species’ adult size and water needs, and quarantine new fish before adding them to the display.FAQ (short answers) What is an aquarium? An aquarium is a contained aquatic environment for fish, plants, and other organisms — a small ecosystem you manage for health and balance. What types of aquariums are there? Common types are freshwater, saltwater (marine/reef), planted (focus on aquatic plants), and brackish; freshwater is best for most beginners. How do I pick size and location? Pick a size that fits your space, budget, and the fish you want. Place the tank away from direct sunlight, near a grounded outlet, and on a sturdy, level stand. What equipment do I need? Basic equipment includes a filter, heater, lighting, thermometer, and water testing kit; decorations like gravel and background items improve appearance and provide hiding places. Why is water chemistry important? Water chemistry (pH, ammonia, nitrite, nitrate, GH/KH) determines fish health; test regularly and correct issues gradually to avoid stress. How do I set up the tank? Clean and level the tank, add substrate and decorations, fill aquarium slowly with treated water, install equipment, and begin cycling before stocking. What is cycling? Cycling establishes beneficial bacteria that convert ammonia to nitrite and then nitrate; fishless cycling is recommended and typically takes 4–6 weeks. How do I choose fish? Match fish to tank size and water parameters, consider temperament and adult size, and add fish gradually to avoid overloading filtration. Should I add live plants? Yes—live plants add beauty and biological benefits, but select species appropriate for your lighting, substrate, and maintenance level. How do I maintain the tank? Follow a routine of daily checks, weekly testing and partial water changes, and monthly filter and substrate care to keep the environment stable. Ready to get started? Download our Aquarium Setup Checklist or shop a beginner starter kit to simplify your setup and make sure you have the right equipment and supplies for success....
Aquarium lighting options
Aquarium Care and Maintenance: A Practical Guide
Welcome to the world of aquariums — compact, living ecosystems that bring color and motion to any room....
pump for fish tank
Find the Perfect pump for fish tank
Start your journey to a calmer, clearer home oasis by choosing the right gear. PetSmart offers a wide...
topfin filters
Discover the Best Topfin Filters for Your Aquarium
Build a thriving aquatic display with equipment designed by a brand that has over two decades of engineering...
Forhadkhan
Forhadkhan
Articles: 249

Leave a Reply

Your email address will not be published. Required fields are marked *